
My lovely new pattern is made with my daisy granny square design and has a tutorial lining and adding your drawstrings. Newly listed in my Etsy shop . Happy Crocheting 🧶 🌸💕
My lovely new pattern is made with my daisy granny square design and has a tutorial lining and adding your drawstrings. Newly listed in my Etsy shop . Happy Crocheting 🧶 🌸💕
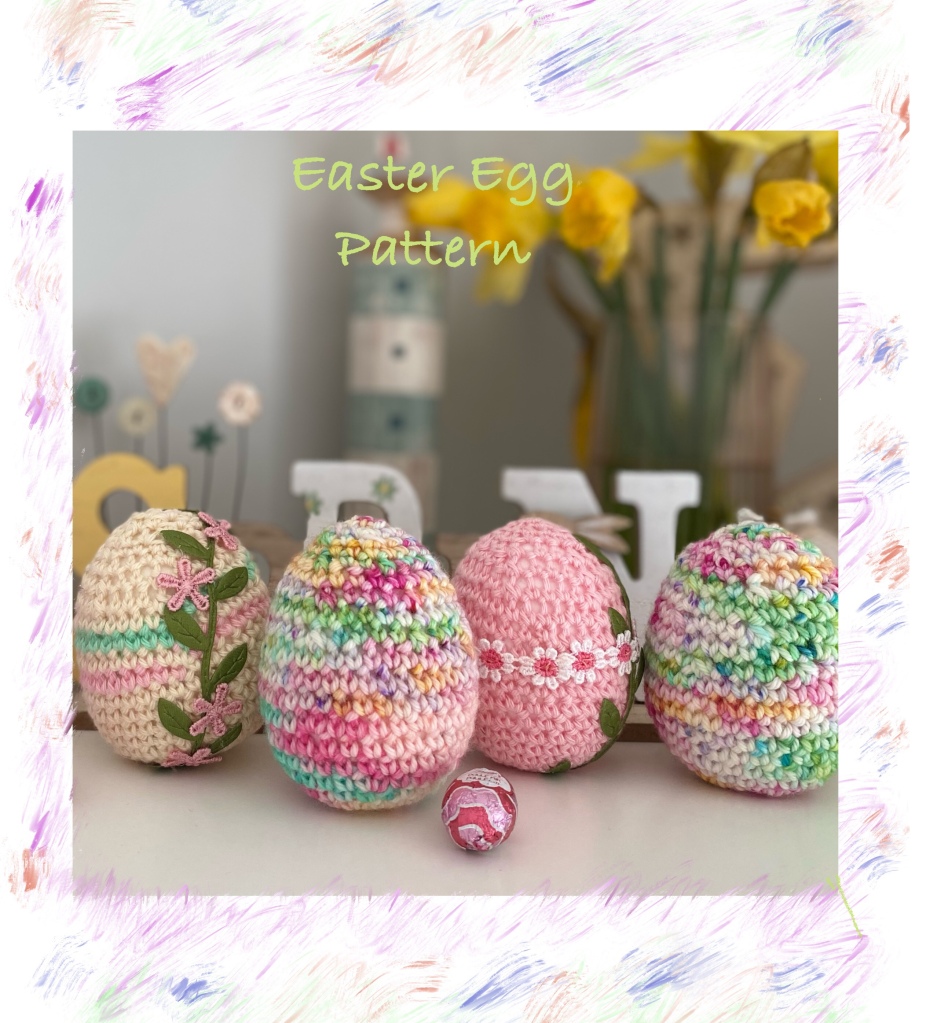
Or visit my Etsy shop for my patterns including my other Easter Egg pattern which is a 6 page pdf pattern .🐰 https://www.etsy.com/shop/SewHappyCreative
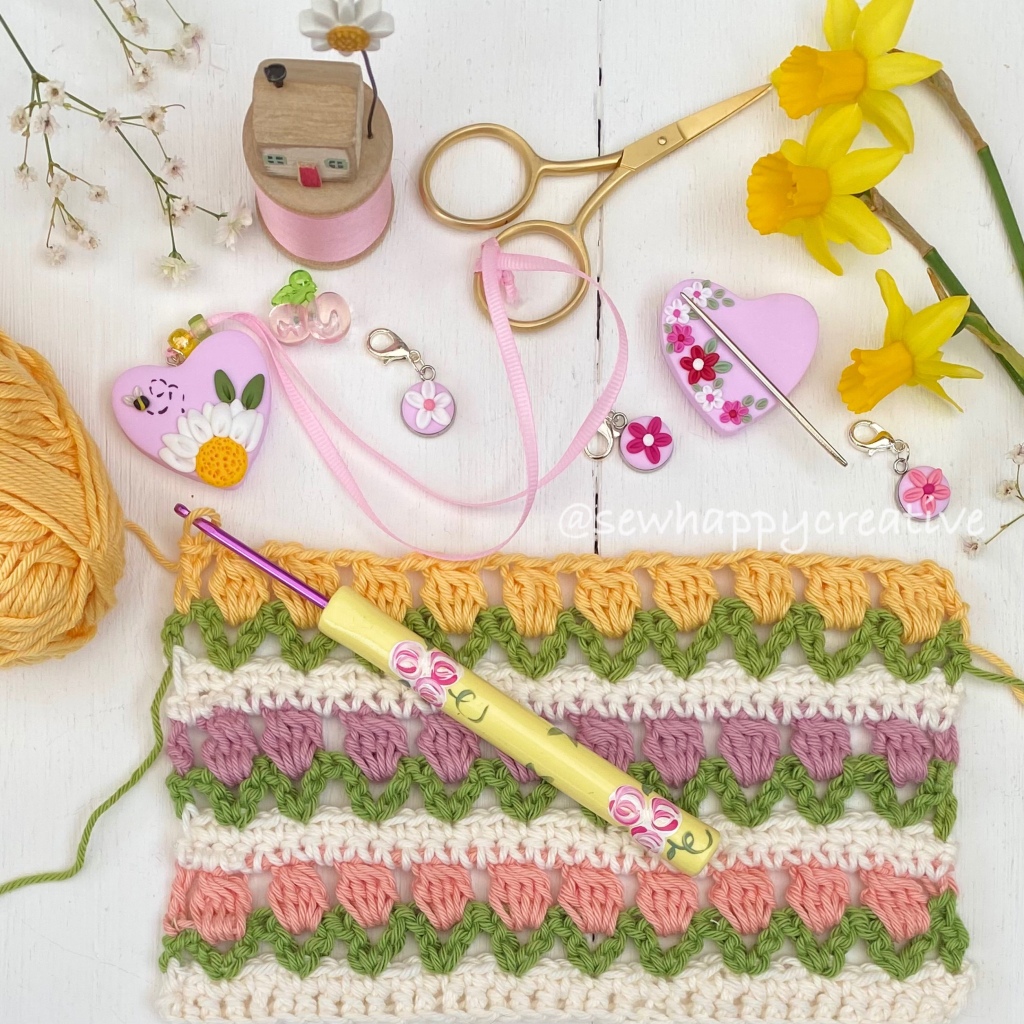
I absolutely adore tulips and every year the ones I planted when my children were small pop up in my garden plant. This cute tutorial is quick to make and makes a beautiful blanket, or table runner or even wrap it around a jar to make a pretty spring jar cover. Whatever you decide on I’m sure it will look stunning. It takes no time at all to make and are perfect for using up small amounts of yarn from your stash. They look fab in all shades and you could try bright pinks, yellow or peach, with a lime or deep leafy green. I have made mine in oddments of Stylecraft classique cotton dk yarn and aran Chalista cotton. Enjoy getting creative, with different colours, happy crocheting💗
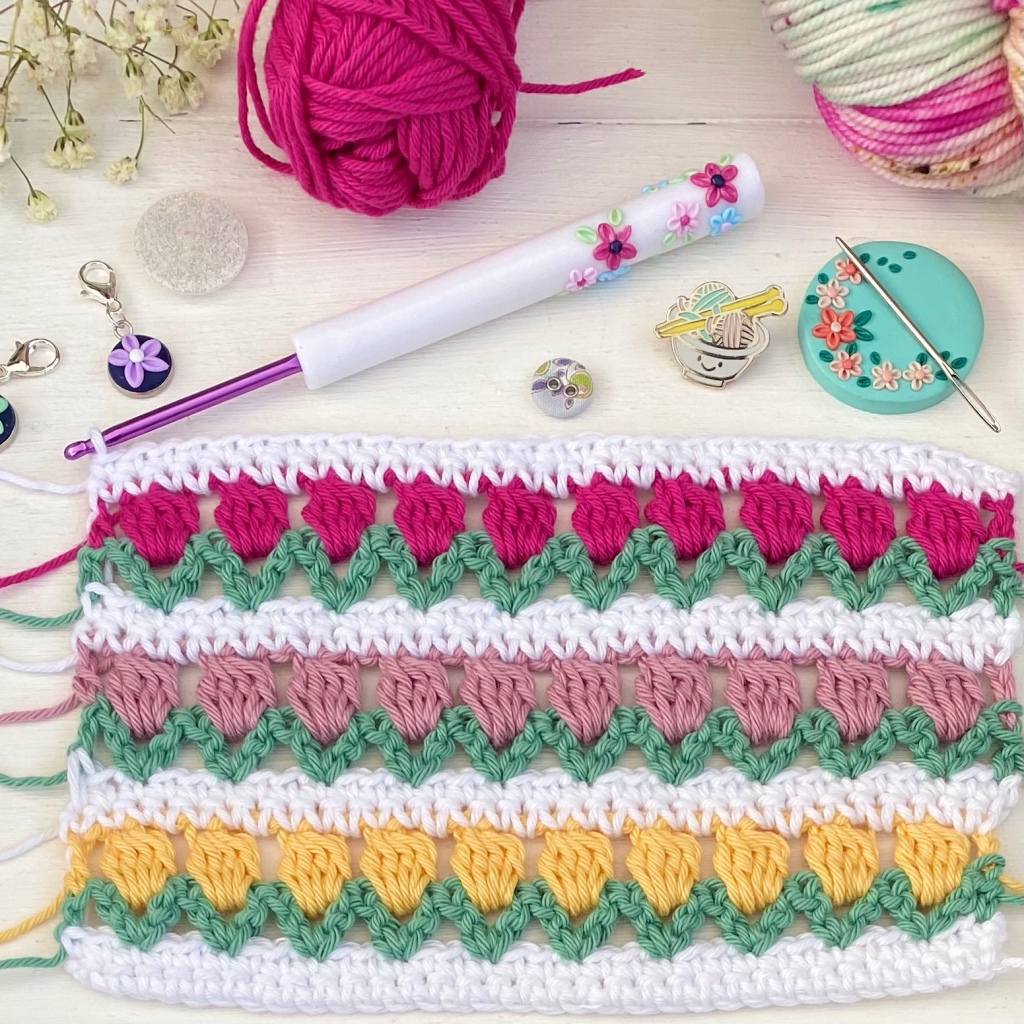
Patterns and tutorials are written in my spare time for you to enjoy in your spare time . I hope you love this quick tulip stitch tutorial and feel inspired do make something pretty, maybe a blanket or pot holder. It’s a really pretty stitch and looks stunning in all shades. Work in multiples of 3 + 2 using a foundation dc method .My sample uses 32 stitches and starts with a foundation treble edge. The leaves are treble stitches and petals treble clusters stitches. See below on how to do. ©Copyright SewHappyCreative 2022
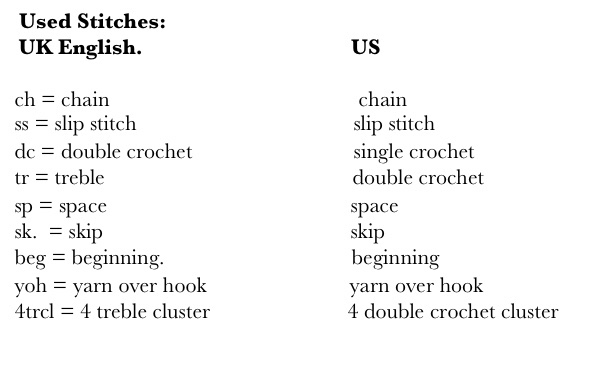
Let’s get started you will need to be familiar with the following stitches. Please note this pattern is written in UK terms.
Pattern notes: My tulip “petals” are made using 4 treble cluster stitches, this is where several stitches are grouped together (in the same space or stitch) by not completing the final part of each stitch and leaving all loops on the hook, before pulling the hook through all the loops of the incomplete stitches at the end, and forming the cluster stitch. It’s much the same as a decrease is done. I used Stylecraft classique cotton dk, but any double knitting yarn will do, and a 4mm hook.
Foundation Round Using any yarn work your foundation double crochet (US sc) in multiples of 3 plus 2 my sample is 32 foundation dc.
Row 1 (RS) Ch1 (does not count as stitch,) dc in every stitch, and join in green for your next row by completing your last stitch with your new shade, turn . Use this method throughout the pattern when you change colour.

Row 2 Using green ch3 (counts as tr), in first stitch, sk 1, 1tr,ch1,1tr, in next stitch, * skip2, (1tr,ch1,1tr,) in next stitch *repeat from * to * until last 2 stitches , sk 1, 1tr in last stitch. (10 pairs of tr, 2 single tr either end of your row)
Row 3 Using your petal shade ch4 (counts as tr plus 1ch), *4trcl, in ch1sp, ch2, *. Repeat from * to * but finish last repeat with a ch1, instead of ch2, 1tr in top of ch-3. (10 petals with 1tr either end of your row).
Row 4 Using white attach yarn into top of last tr from previous row, ch1 ( does not count as stitch), dc in ch-1sp of previous round, *1dc in each of next 2 stitches of your petal top, 1dc in the space between petals, * repeat from * to * until last tr, 1dc in the top of last tr.(32stitches)
Row 5, Ch1 ( does not count as stitch), dc in each dc around..( 32sts)
Rows 2 – 5 form the pattern, repeat as many times as you like 💗

There are lots more patterns available in my Etsy Shop all come with highly detailed written pattern and photo tutorials as PDF patterns https://www.etsy.com/uk/SewHappyCreative/listing/868167377/granny-square-crochet-pattern-notion ©Copyright SewHappyCreative 2022.
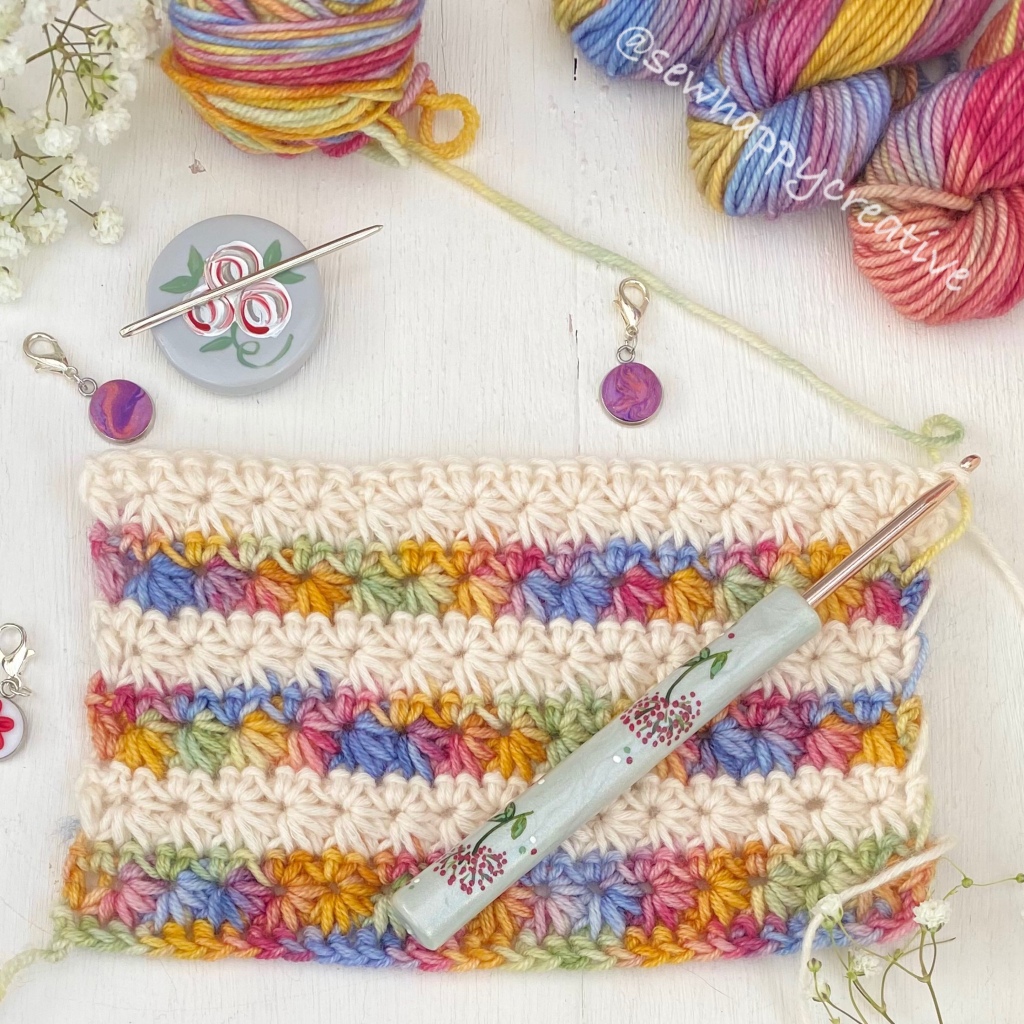
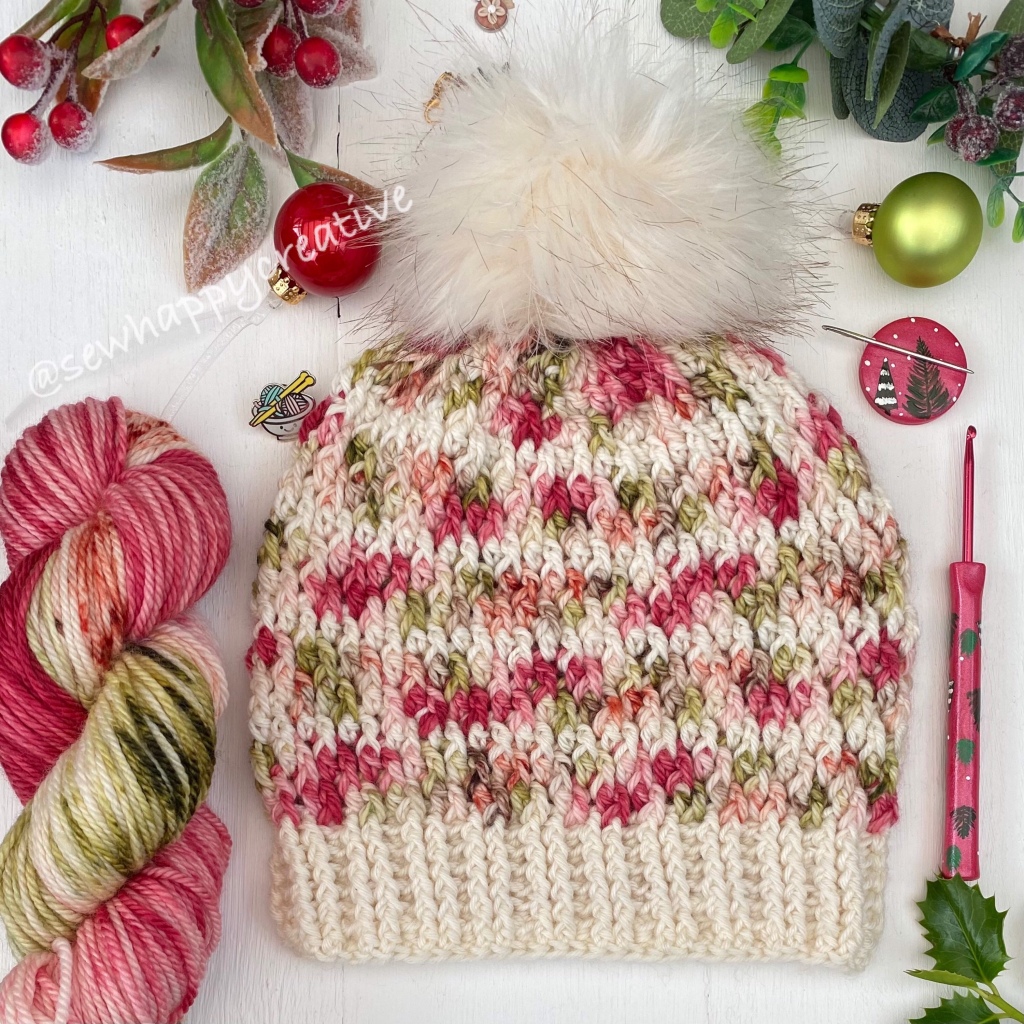
A very Happy New Year to you and here’s a gift tutorial for Star Stitch which is a really striking pretty textured stitch, it looks fabulous in 2 shades and equally as pretty in just the one shade. If you are working in 2 shades it’s fine to carry it up the side of your work, any more than 2 I’d fasten off and start with a new shade. It all depends on your skill level and how confident you feel in working in separate shades, but remember where there is colour there is yarn ends to sew in 🙈. This is how I made mine. As this is a tutorial and not a pattern I have not added a key, hook size or yarn because whatever yarn you choose select the appropriate hook size for that yarn. I give my free time to write tutorials and patterns as a thank you for supporting my Etsy shop but the same copyright applies as to my paid patterns.
This pattern/tutorial remains the property of SewHappyCreative, you may not copy, share, reproduce or sell the pattern itself. You are welcome to sell your finished creations in small quantities made from this pattern, but we kindly ask that you credit us and that you link to our Etsy Shop http://www.etsy.com/shop/SewHappyCreative if selling online. ©Copyright SewHappyCreative 2022. The photos used in my tutorial may not be shared without prior permission.
My Star Stitch tutorial uses foundation dc, if you have purchased my hat, mitten and bag patterns you will be familiar with this stitch as I include a separate tutorial for this stitch just like my flower Festival Bag pattern https://www.etsy.com/uk/SewHappyCreative/listing/727842753/flower-festival-bag-granny-square? My tutorial uses dc (US sc) stitch and half treble ( half Dc US). Pattern notes : To make the star it’s like making a cluster stitch you insert your hook pull a loop through but don’t complete the stitch and then continue to insert your hook where indicated pulling up a loop each time until you have 6 loops for each stitch on your hook and then yoh and pull through all 6 loops, work a ch1 to anchor the stitch in place but this ch-1 stitch is also the place where you start your subsequent star stitches. Keep your tension really even or you will easily pull in your work, if you tend to have a tight tension work loosely. My swatch uses 31 foundation dc creating 15 stars ⭐️ You could use either foundation treble or foundation dc. I have used fdc but ftr would give you a nice border eg a blanket or cowl .
Step 1. To begin, make your desired length in foundation dc in multiples of 2 plus 1.
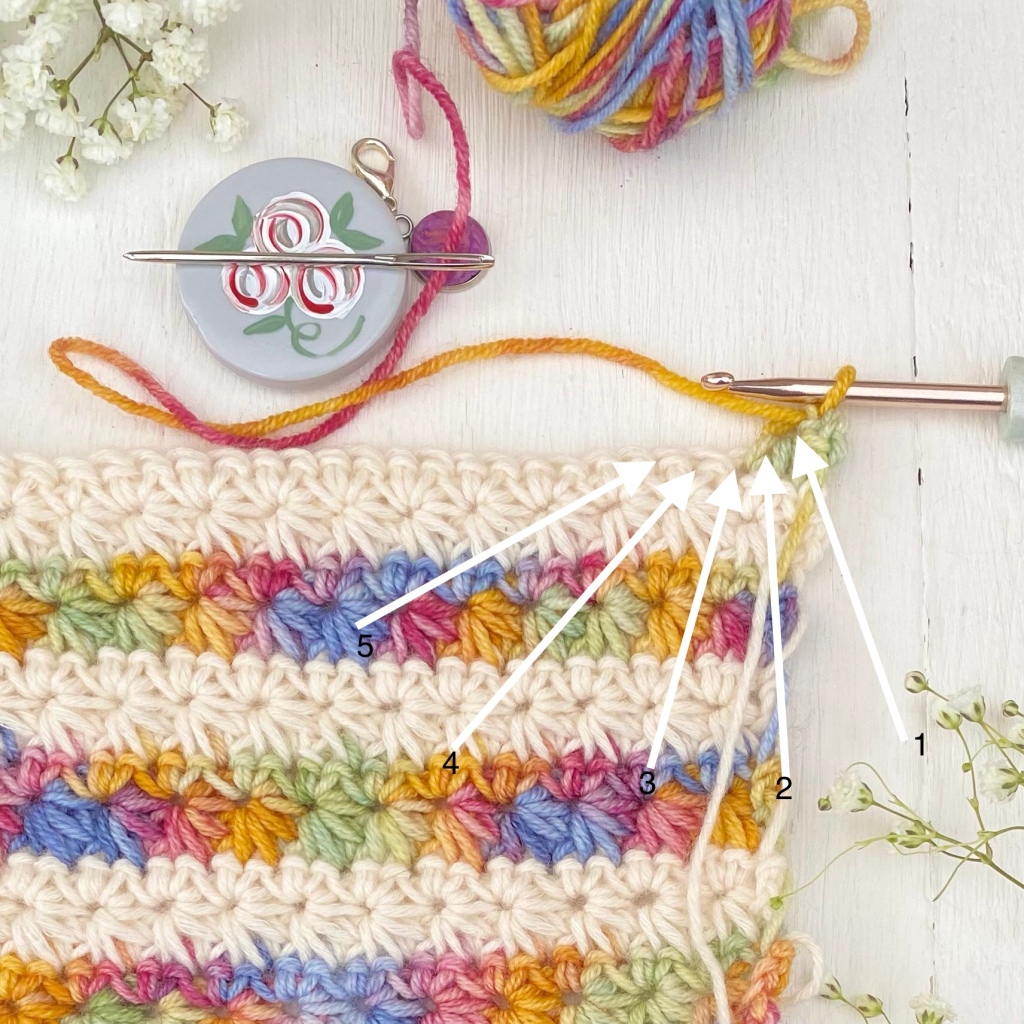
Step 2. Turn your work and ch 3, into the the 3rd chain from your hook, insert your hook and pull up a loop, now insert your hook into the same chain only this time in front of the chain and pull through a loop, there are now 3 loops on your hook, insert your hook into the next 3 stitches pulling up a loop in each one of them, you now have 6 loops on your hook, yoh and pull through all 6 loops, ch1. This is your first star stitch completed.
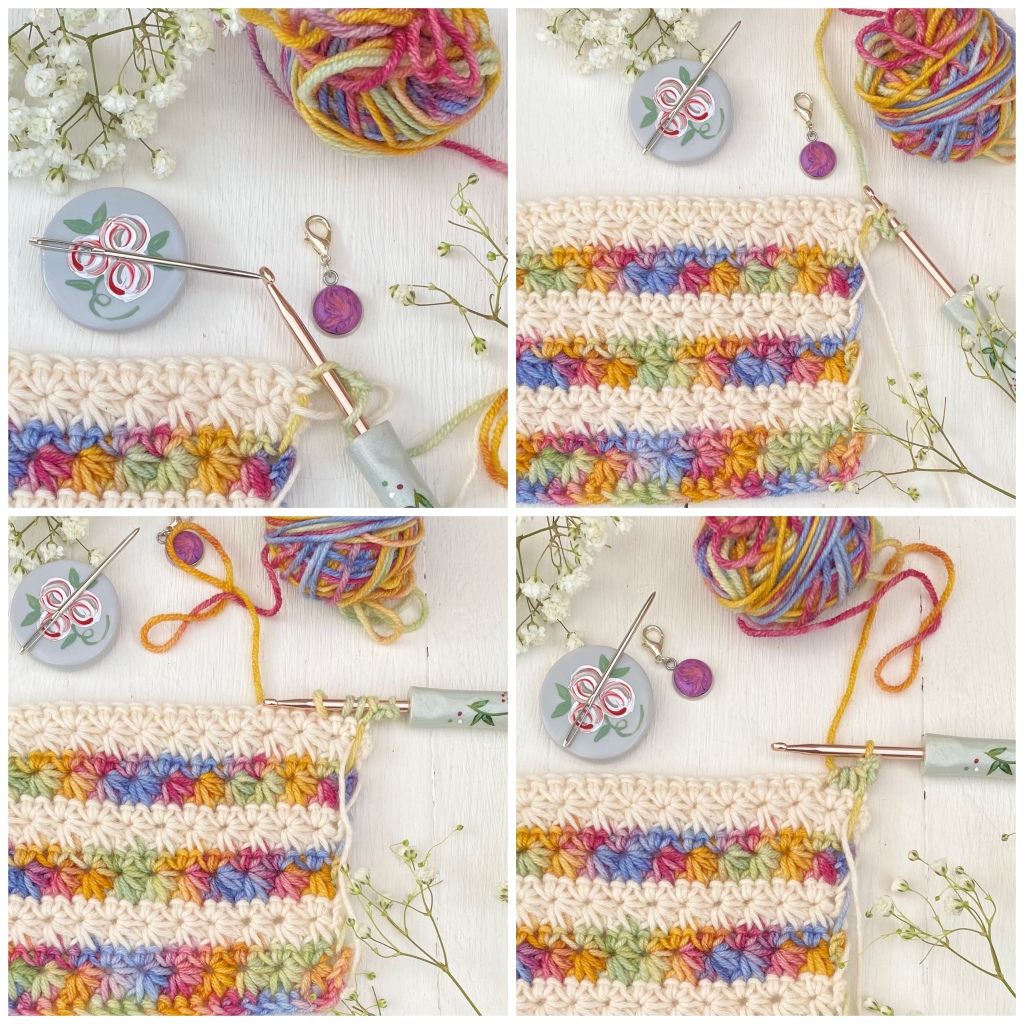
Step 3 Use the photo below with the arrows to guide you, insert your hook into the the ch-1 you made when you completed your first star stitch, pull up a loop, now insert your hook into the side of your first star stitch ( make sure you go through 2 loops in the side, it looks like a chain stitch ) and pull up another loop, there are now 3 loops on your hook, place your hook into the base of that stitch, pull up a loop, insert your hook into the next 2 stitches pulling up a loop in each one of them as before, you now have 6 loops on your hook, yoh and pull through all 6 loops, ch1. This is your 2nd star stitch completed, continue working your star stitch like this until you reach the last stitch when you complete your last star stitch, work 1 htr in the same stitch. Turn your work .
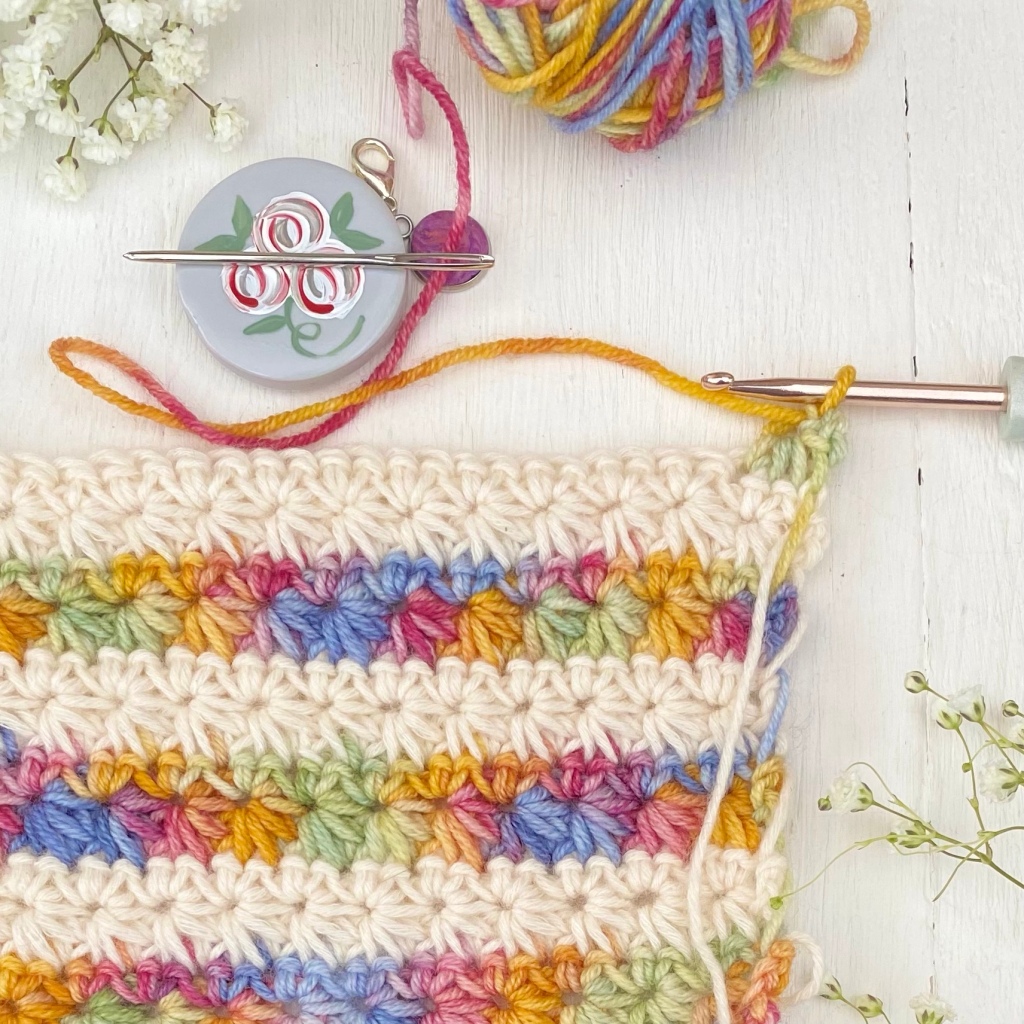
Step 4 Ch1 (does not count as stitch), 1dc in next st, 1dc in the centre of the star created by your ch-1 from previous row, then work 2dc in every ch-1sp until you reach the end , then work 1dc in the last stitch.
As you build your rows of stars, all your star stitches should be in line.
These 2 rows form the pattern, repeat as many times as you like ⭐️


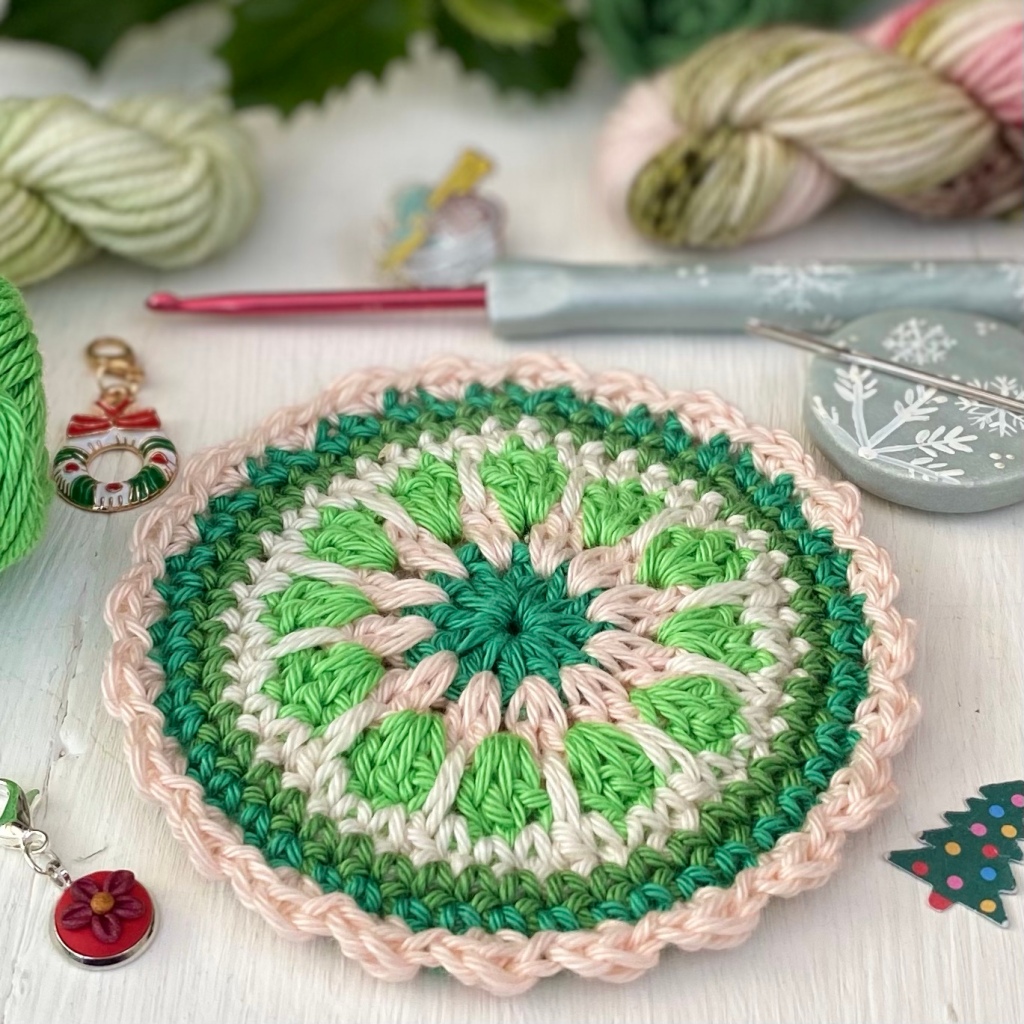
A cute little coaster to add to your festive table, it’s really quick to make and you can whizz a set of these off your hook in an evening, wishing you a wonderful Christmas. Best wishes Fiona xx
All of my free patterns are written in my spare time, patterns take a long time to write and are given as a thank you for supporting my small business. The copyright is exactly the same as if you were purchasing a pattern from my Etsy shop. Please do not copy, share, reproduce, alter or sell the pattern itself. You are welcome to sell your finished creations in small quantities made from this pattern, but we kindly ask that you credit us and that you link to our Etsy Shop www.etsy.com/shop/SewHappyCreative if selling online. ©Copyright SewHappyCreative 2021 This pattern remains the property of SewHappyCreative.
Foundation Round Using any colour make a magic loop or ch5, ss to join into a ring.
Round 1 Into the magic loop or ring ch3 (counts as tr), 11tr into the ring, ss to join into beg ch-3, fasten off. (12tr)
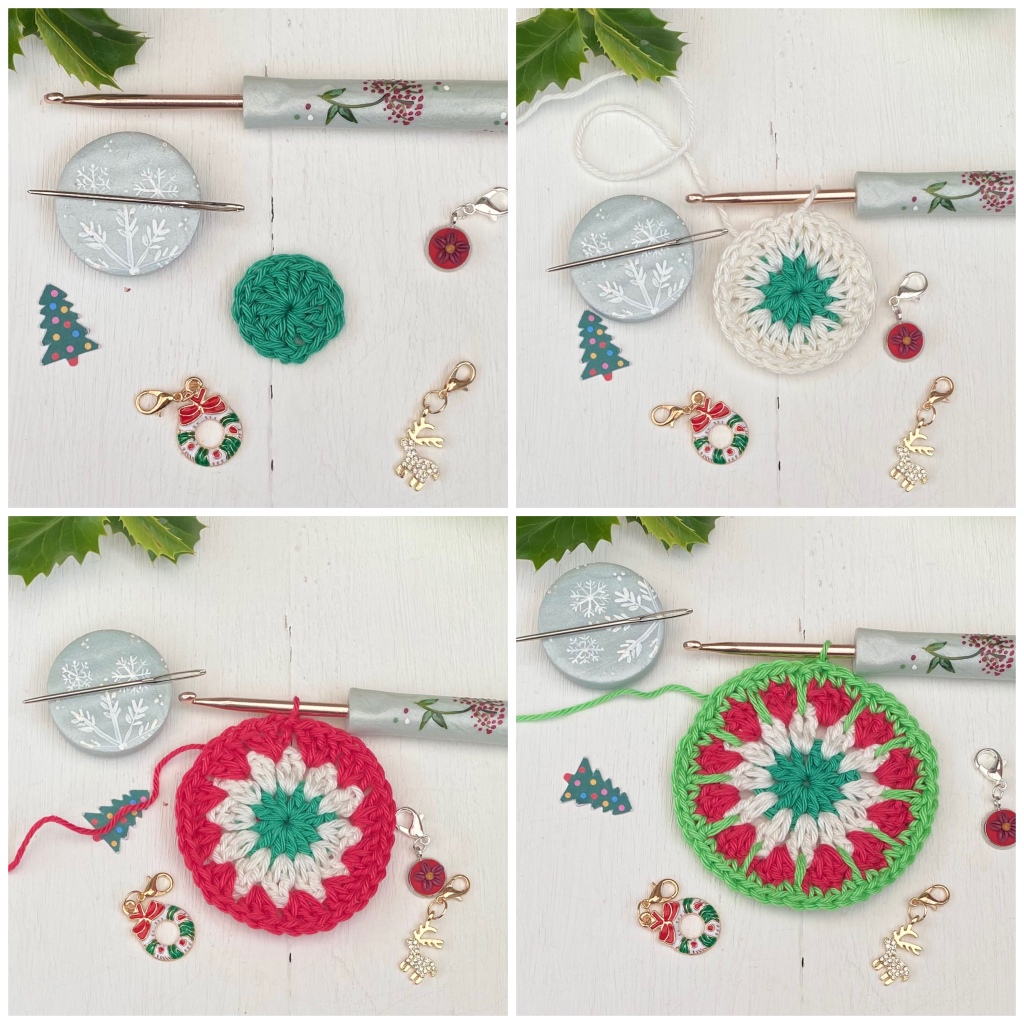
Round 2 Attach a new colour in between any tr of round 1, Ch3 (counts as tr,), 1tr, in same space, 2tr, in between each tr around, ss to join into beg ch-3, fasten off.(24 tr)
Round 3 Attach a new colour in between any 2tr group of round 1, Ch3 (counts as tr,), 2tr, in same space, 3tr, in between each tr around, ss to join into beg ch-3, fasten off.(36 tr)
Round 4 Attach a new colour in between any tr of round 2 ch 1(counts as dc ), this creates a long dc spike stitch, 1dc, in each of next 3 tr, *dc in between the 2tr group of Round 3, to create a long dc spike stitch, 1dc in each of next 3tr, * repeat from * to * around , ss to join into beg ch-1 fasten off.
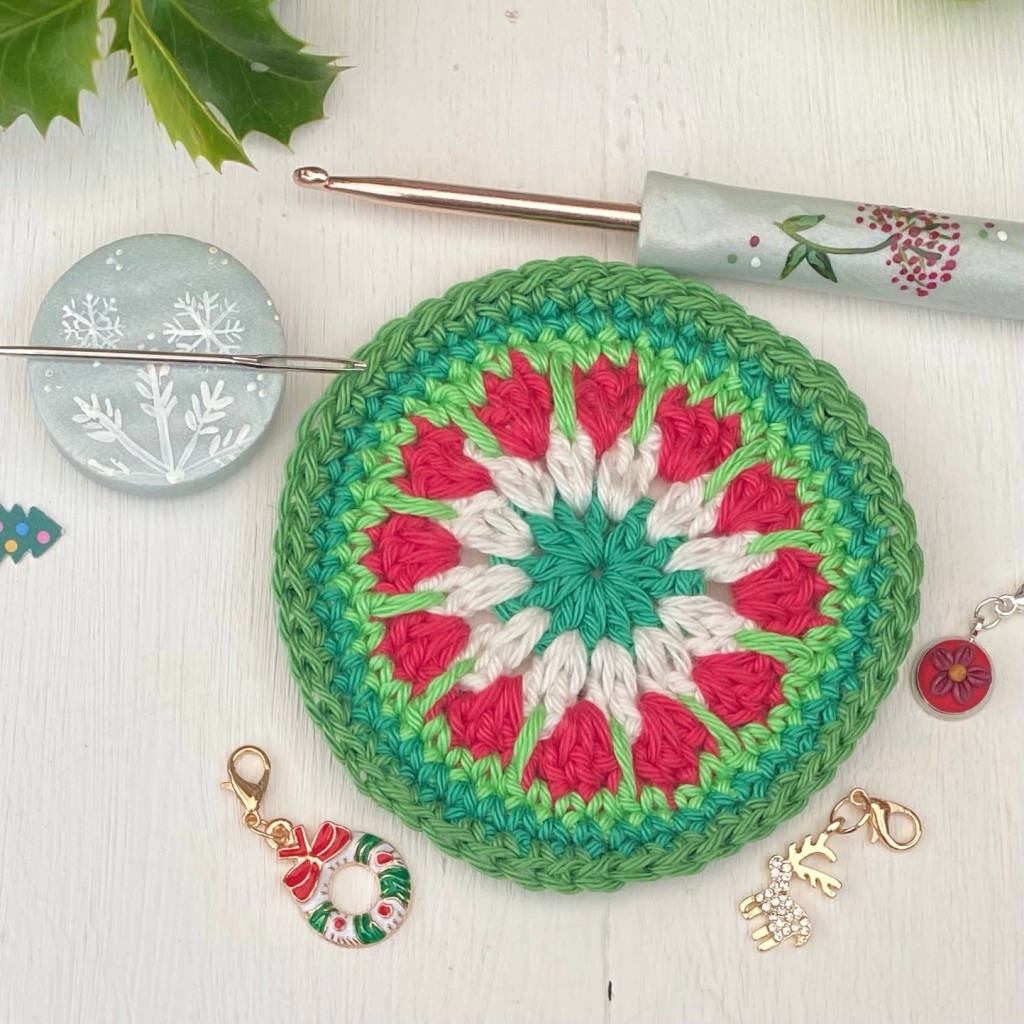
Rounds 5 Attach a new colour in any dc of previous round, ch1 (counts as dc,), 1dc, in every stitch around, ss to join into beg ch-3, fasten off.(48sts) Rounds 6 -As Round 5
Rounds 7- border – Attach a new colour in any dc of previous round, ch1 (counts as dc,)1dc, in same stitch, ss in next st, *2dc in next st, ss in next st, * repeat from * to * around , ss to join into beg ch-1, fasten off.
Happy crocheting and a very happy Christmas. For more lovely patterns and my hand dyed yarn visit my Etsy shop https://www.etsy.com/shop/SewHappyCreative or to see my hand yarn and patterns first pop over to our Facebook page https://www.facebook.com/sewhappycreative/


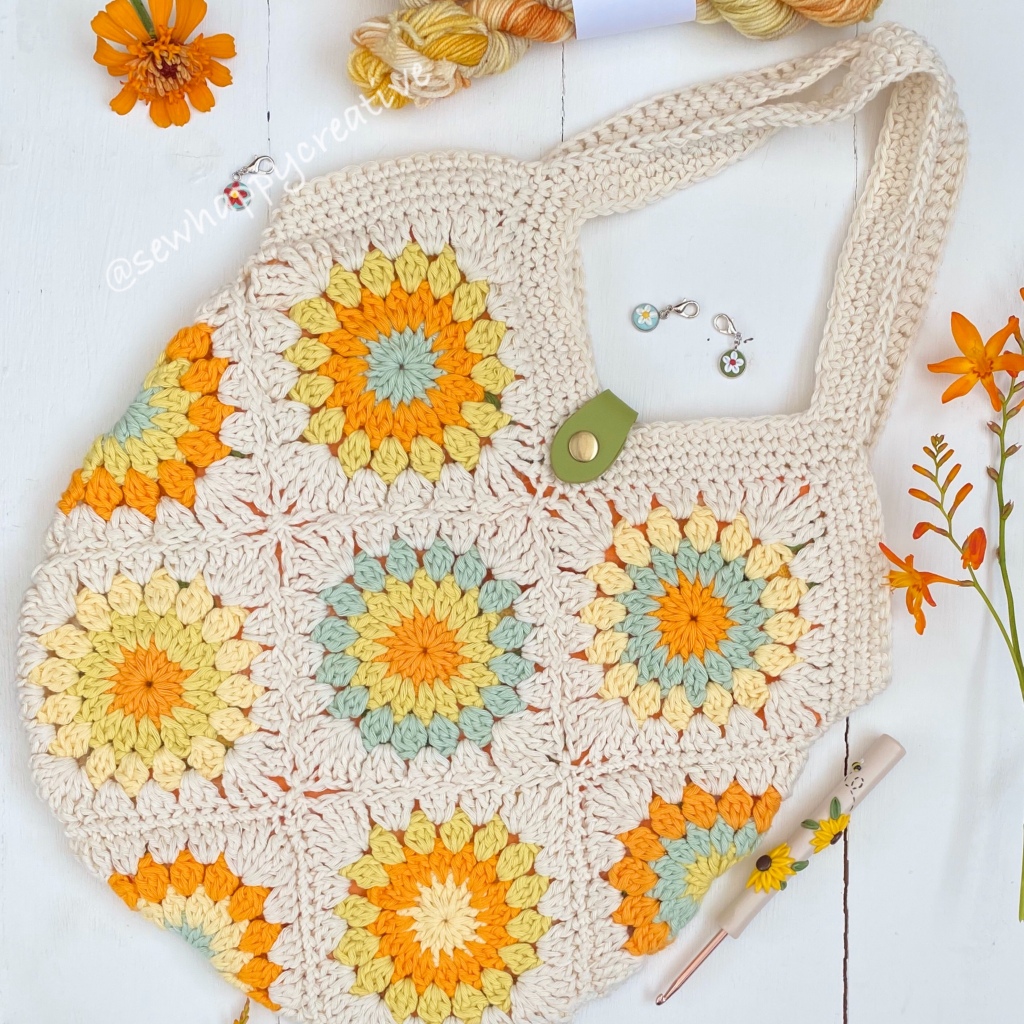
The bag is a follow on from our popular flower Festival Bag pattern using my pattern of a sunburst granny square. Skill level for this pattern is intermediate. My crochet bag is made of granny sunburst motif , joined using a continuous join with some simple stitching to complete. Included in my pattern is my interpretation of a continuous join tutorial, a full photo tutorial with “map” to guide you through, there’s also a foundation treble tutorial is on page 15. As a bonus I’ve included my lining pattern notes. So grab your hook and lets get started… Pattern only available in my Etsy shop https://www.etsy.com/uk/SewHappyCreative/listing/1045826686/always-the-sun-granny-square-crochet-bag 🧡
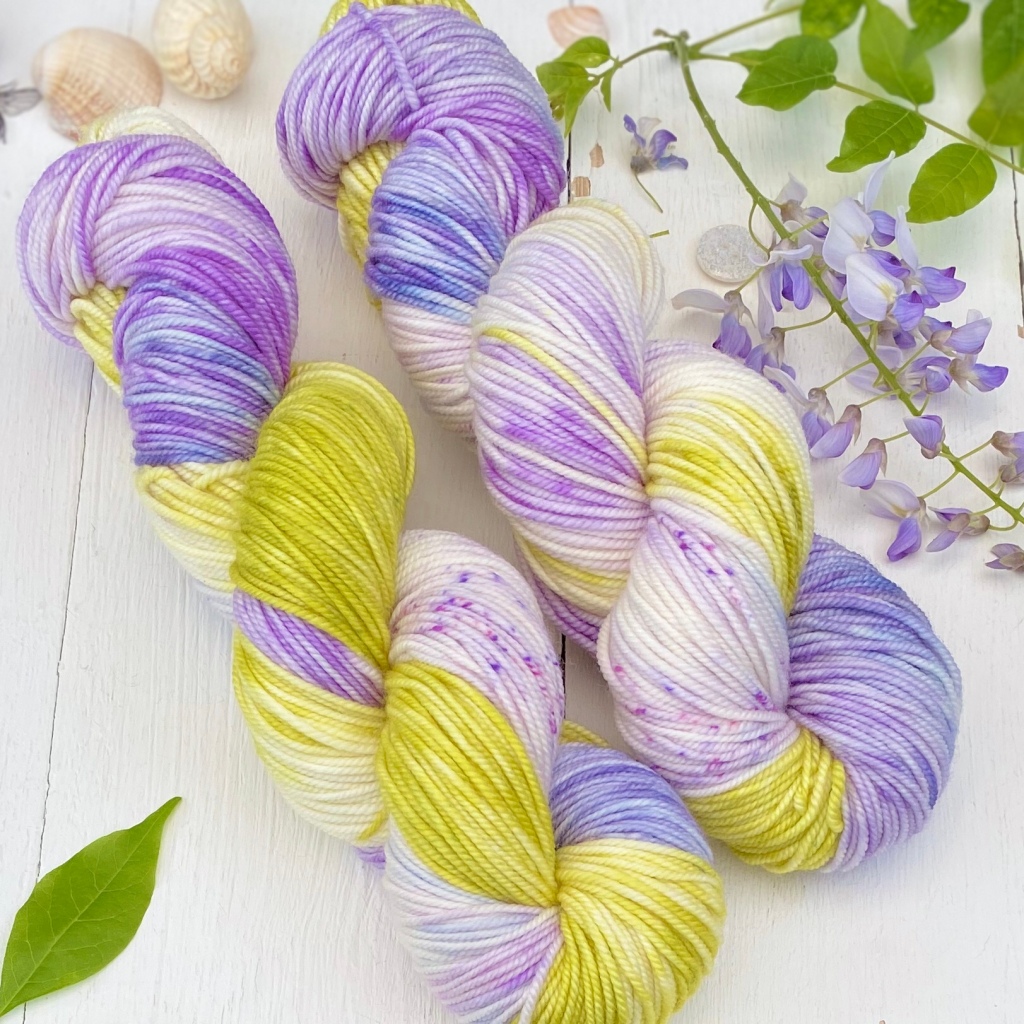
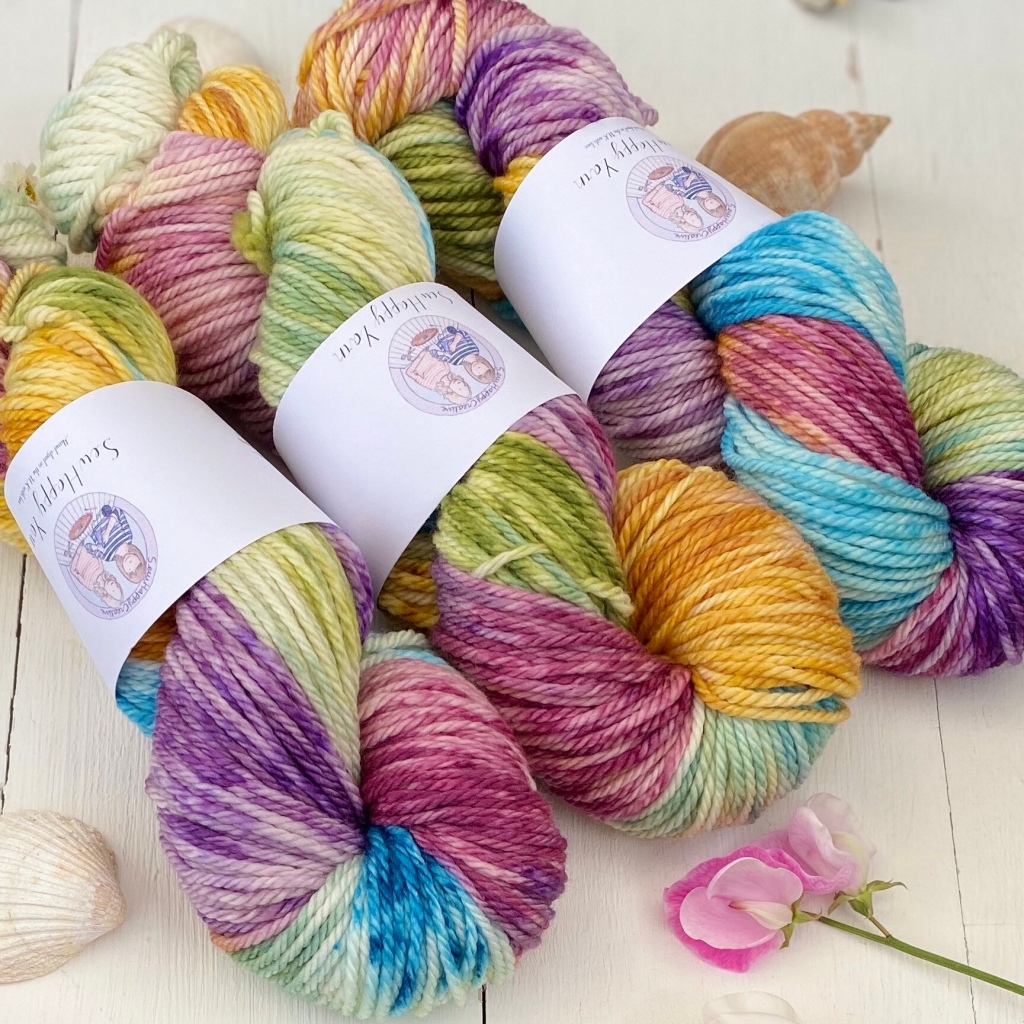
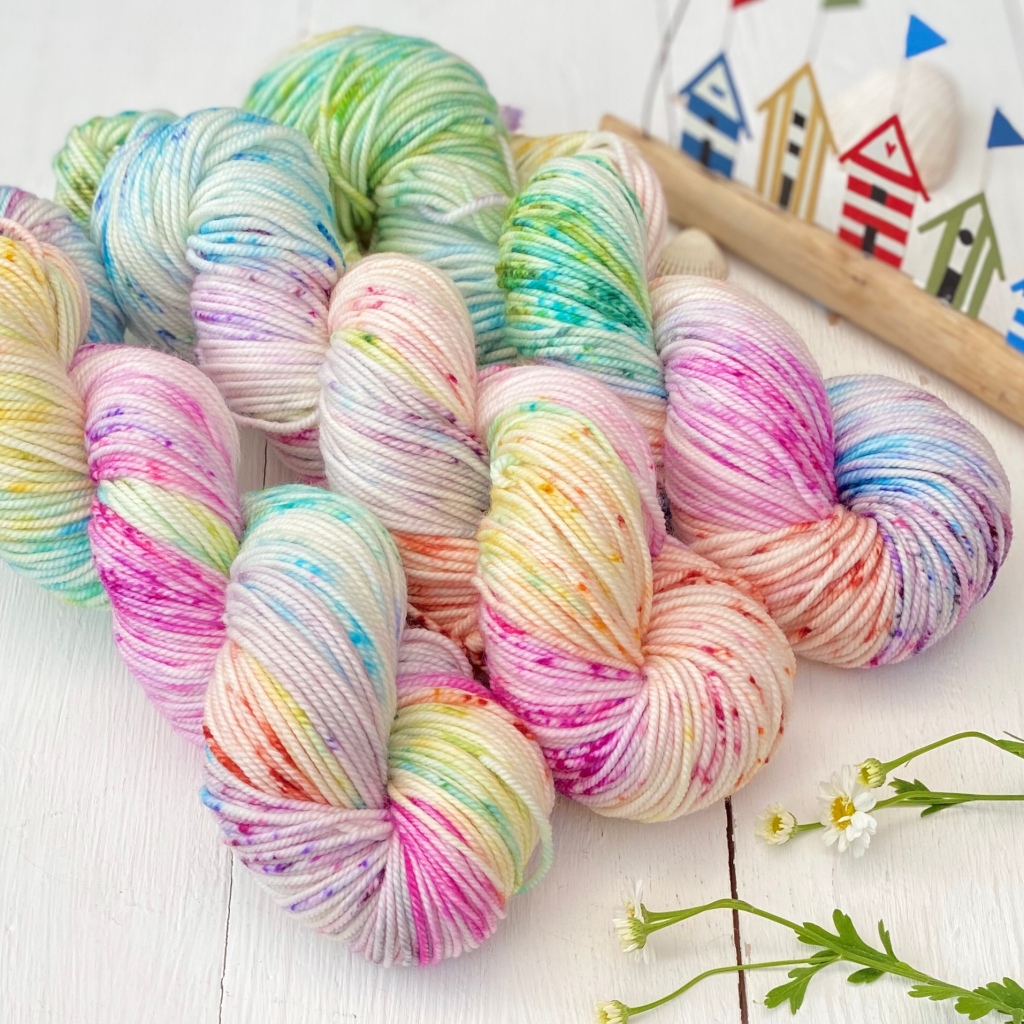
We get lots of messages about the “variegated” yarns we use in our photos and patterns. The yarn is our own hand dyed yarn and available in our Etsy shop. We have a range of mini skeins in dk and 4ply which come in sets of 3 starting from £11.25 per set and double knitting yarn and Aran. Our Aran yarn has 10% off ( sale ends today 4th July 2021) . We also offer Free UK Shipping on orders of yarn over £25. You will need to use the code for this which can be found on our shop announcement. https://www.etsy.com/shop/SewHappyCreative

New pattern in my Etsy shop and 10% off all my patterns in my Etsy shop 🧡 My sunny sunburst granny square is a variation on a traditional sunburst granny square. The pattern is full of lovely summery photos and includes all the shades I’ve used and detailed instructions which includes my stitches used. 🧡
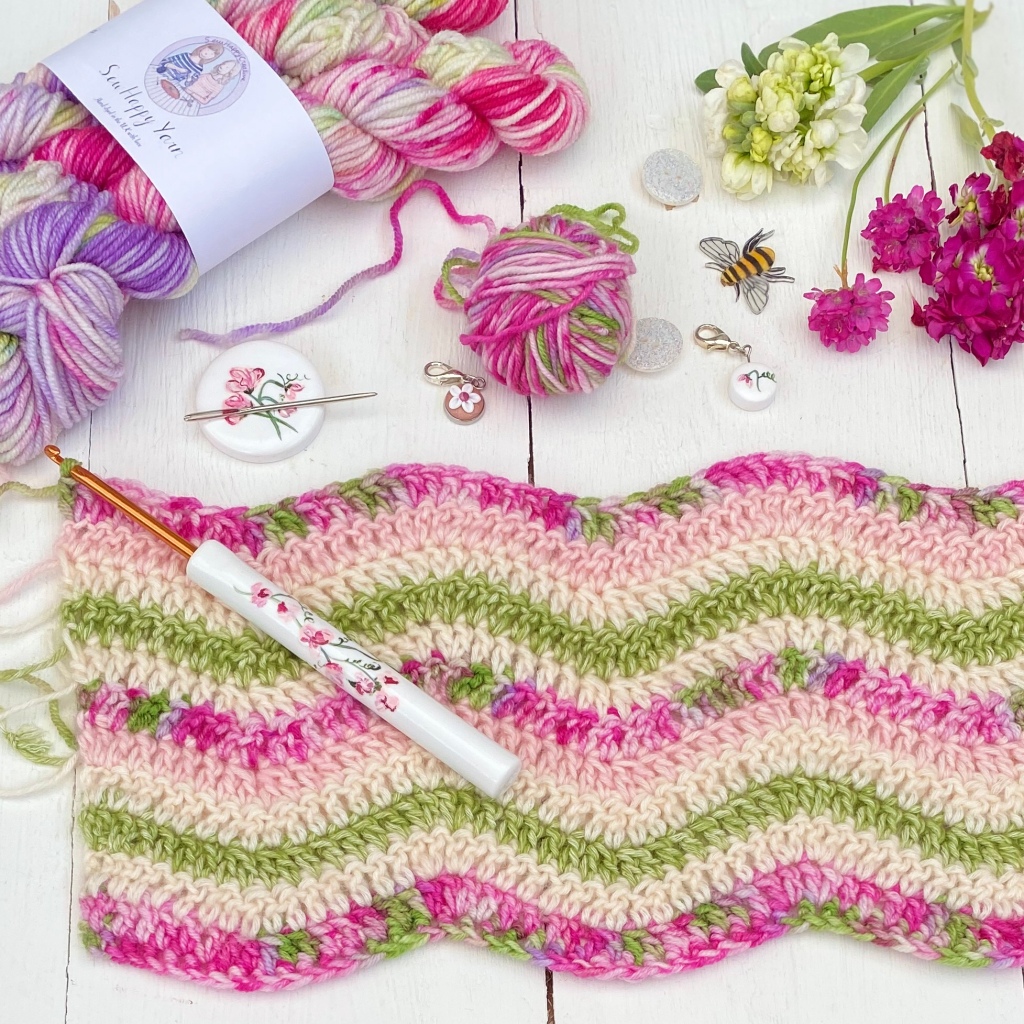
There’s something very soothing about a ripple pattern and there are many interpretations of the granny ripple. My pattern is a gentle wave achieved by spacing more stitches between each ripple. To create a ripple you are basically making “peaks” and “valleys“ and this is done by decreasing stitches in your valley and increasing at your peaks, it’s all about the maths and providing you do all this correctly on each row you will whizz along, so it’s always worth checking each row to make sure it’s correct. Please note this is is not a full pattern it’s a quick tutorial for how I made my blanket and written in my spare time.
This is how I made mine, I’ve used a repeat of 16 stitches, with a starting chain of 16 plus 3 eg if you make a blanket with 7 repeats, you would need a starting chain of 16 x 7 + 3 = 112. I prefer to use foundation dc (US fdc) for my blanket for this method use your repeat only 16 x however many times as you like.
For my tutorial I’ve written it using the starting chain method . Decide on how wide you want your blanket and make your chain. Please note all in brackets it will indicate how many times you do this after the brackets.
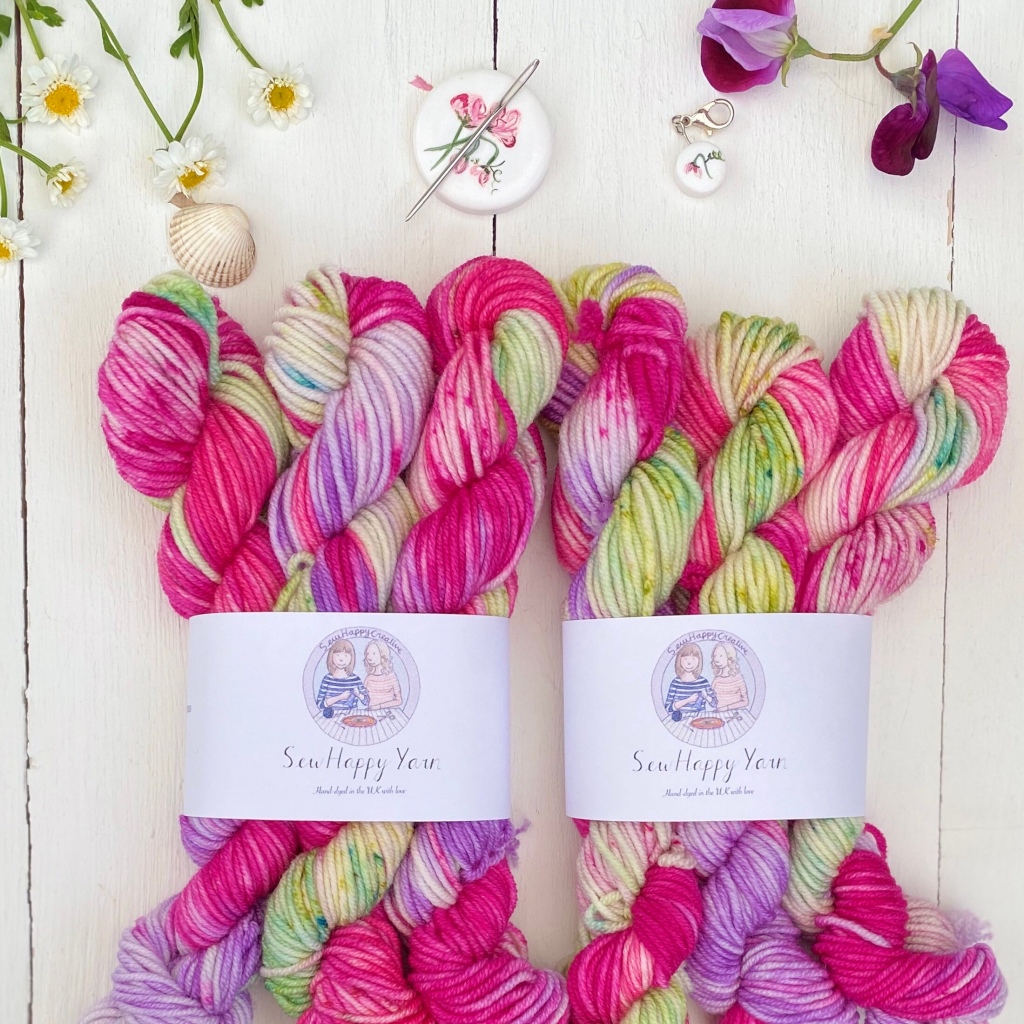
Abbreviations for Stitches used are treble (US dc), ch =chain, yoh = yarn over hook, 2tr tog, this is where you work 2 incomplete trebles like a cluster stitch. See stitch below. Any size hook to suit your yarn. Pink version uses my own hand dyed yarn sweet pea, for availability on all my hand dyed yarn 🧶 and patterns please visit my Etsy shop or message via Etsy conversation https://www.etsy.com/shop/SewHappyCreative Scheepjes stonewashed in Canada jade 806, pink Quartzite 821,Tourmaline 836, and rose quartz 820.
2tr tog = 2 treble together. Yoh, insert hook into tr, yoh and pull through a loop, 3 loops on hook ,yoh and pull through 2 loops,) 2 loops on hook, yoh, insert hook into next tr, yoh and pull through a loop, 4 loops on hook ,yoh and pull through 2 loops, yoh, and pull through remaining 3 loops on hook. You have completed your 2trtog.
Foundation Row . Into the 4th chain from your hook 1tr, 1tr in each of next 5 ch, (2tr tog over next 2 ch) twice, 1tr in each of next 5ch, *(2tr in next ch) twice, 1tr in each of next 5ch, (2tr tog over next 2 ch) twice, 1tr, in each of next 5ch, *repeat from * to * as many times as you like, until last ch, ending the row with 2tr in the last ch.
Row 1 and all subsequent rows . chain 3 (counts as tr), 1 tr in tr at base of 3ch, 1tr in each of next 5 ch, (2tr tog over next 2 ch) twice, 1tr in each of next 5ch, *(2tr in next ch) twice, 1tr in each of next 5ch, (2tr tog over next 2 ch) twice, 1tr, in each of next 5ch, *repeat from * to * as many times as you like, until last ch, ending the row with 2tr in last ch.

This tutorial remains the property of SewHappyCreative, you may not copy, share, reproduce including any video tutorial or sell the pattern itself. You are welcome to sell your finished creations in small quantities made from this pattern, but we kindly ask that you credit us and that you link to our Etsy Shop http://www.etsy.com/shop/SewHappyCreative if selling online. ©Copyright SewHappyCreative 2021.
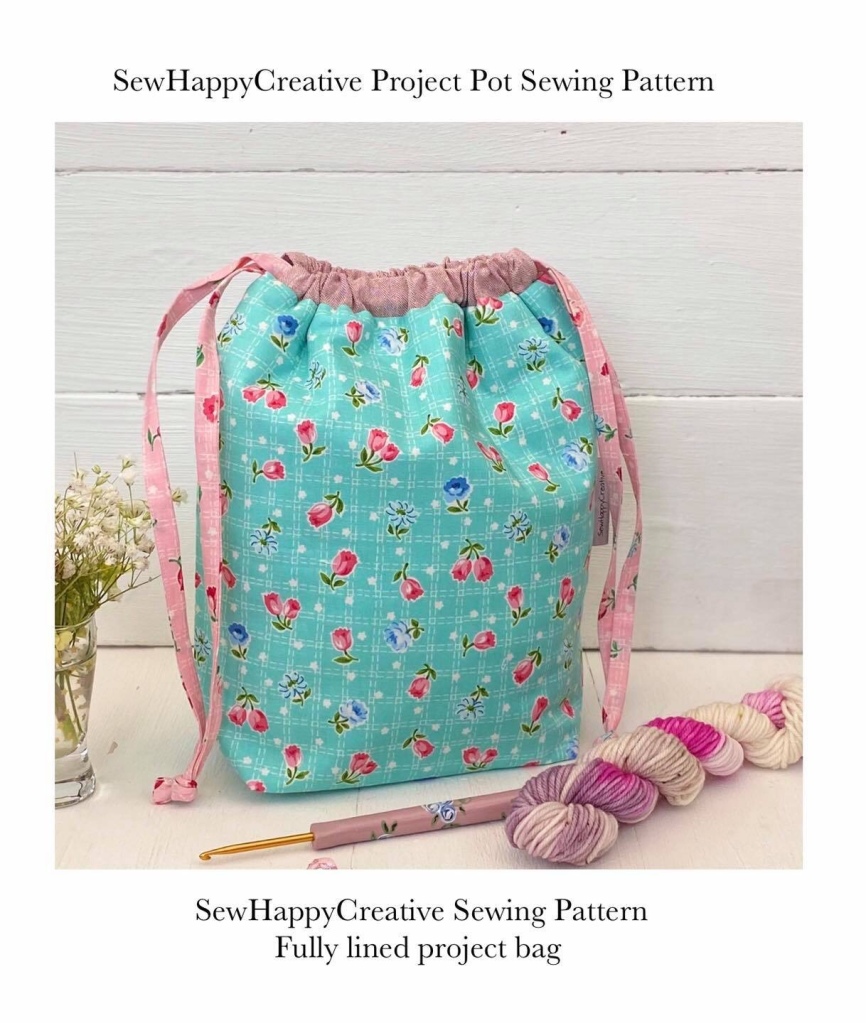
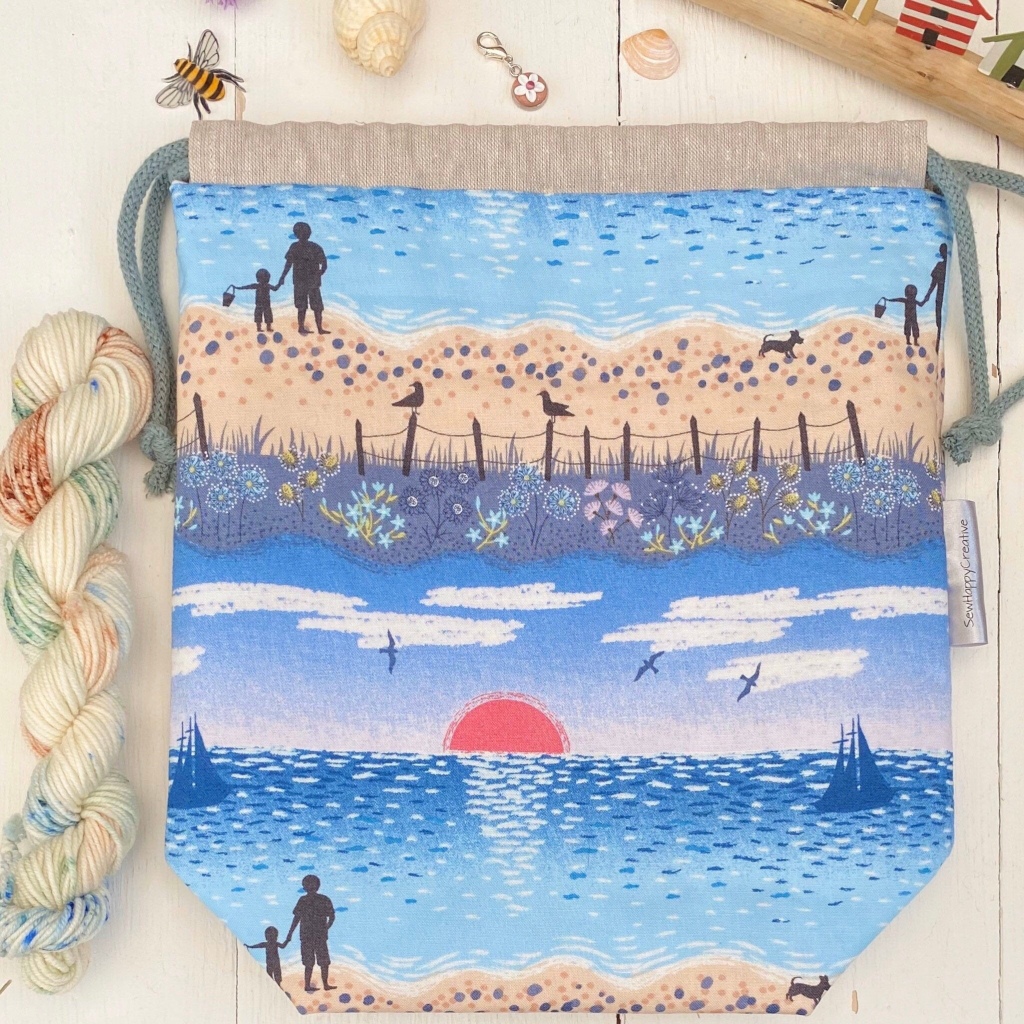
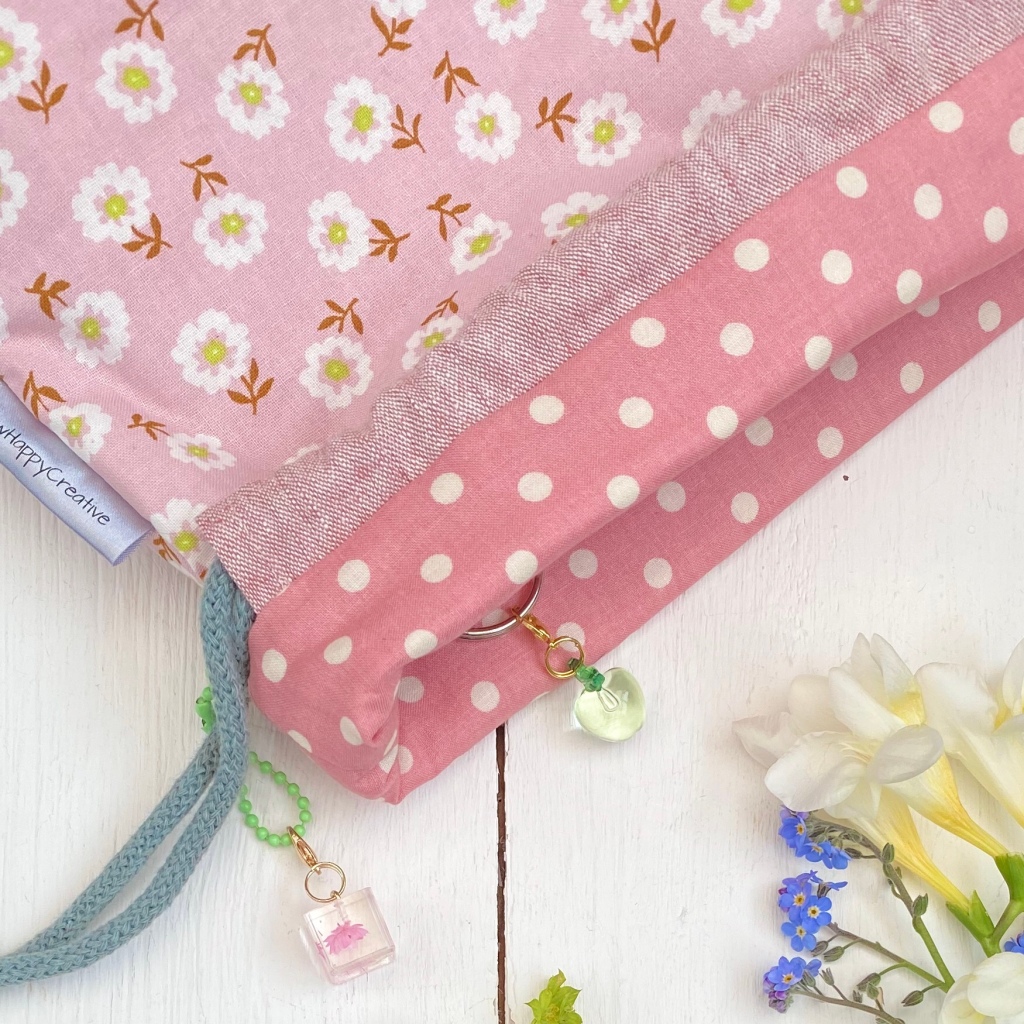
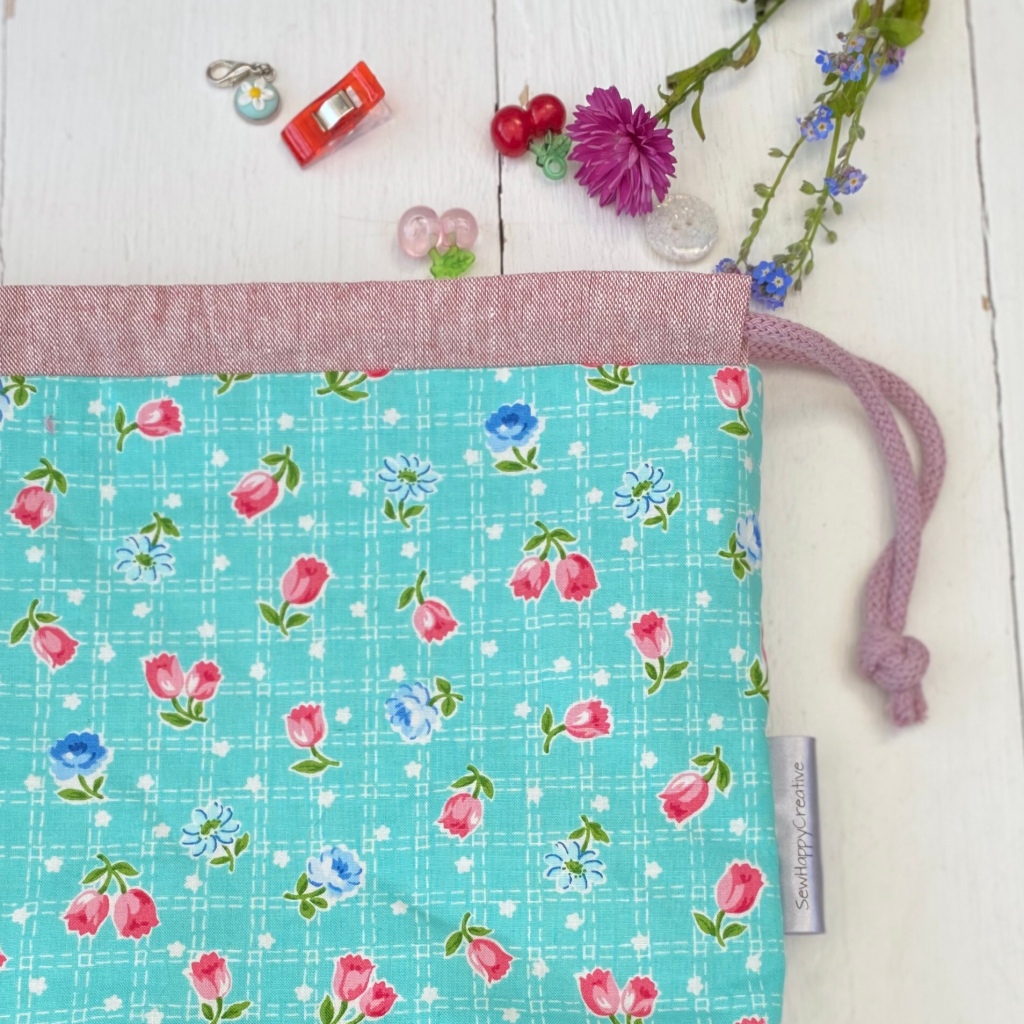
This week we launched our first sewing 🧵 pattern of our popular project bag that we sell in our Etsy shop. It’s a fully lined medium sized project bag and has more than 30 photos to help you make our bag. It has a fleece interlining and a tag for your stitch markers inserted into the lining. The pattern is a 13 page pdf pattern and available from our Etsy Shop https://www.etsy.com/uk/SewHappyCreative/listing/1015322656/drawstring-bag-sewing-pattern-pdf at the moment it has 10% off