Hope Rainbow Blanket Pattern

Hope Traditional Granny square blanket pattern :Rounds 1-10

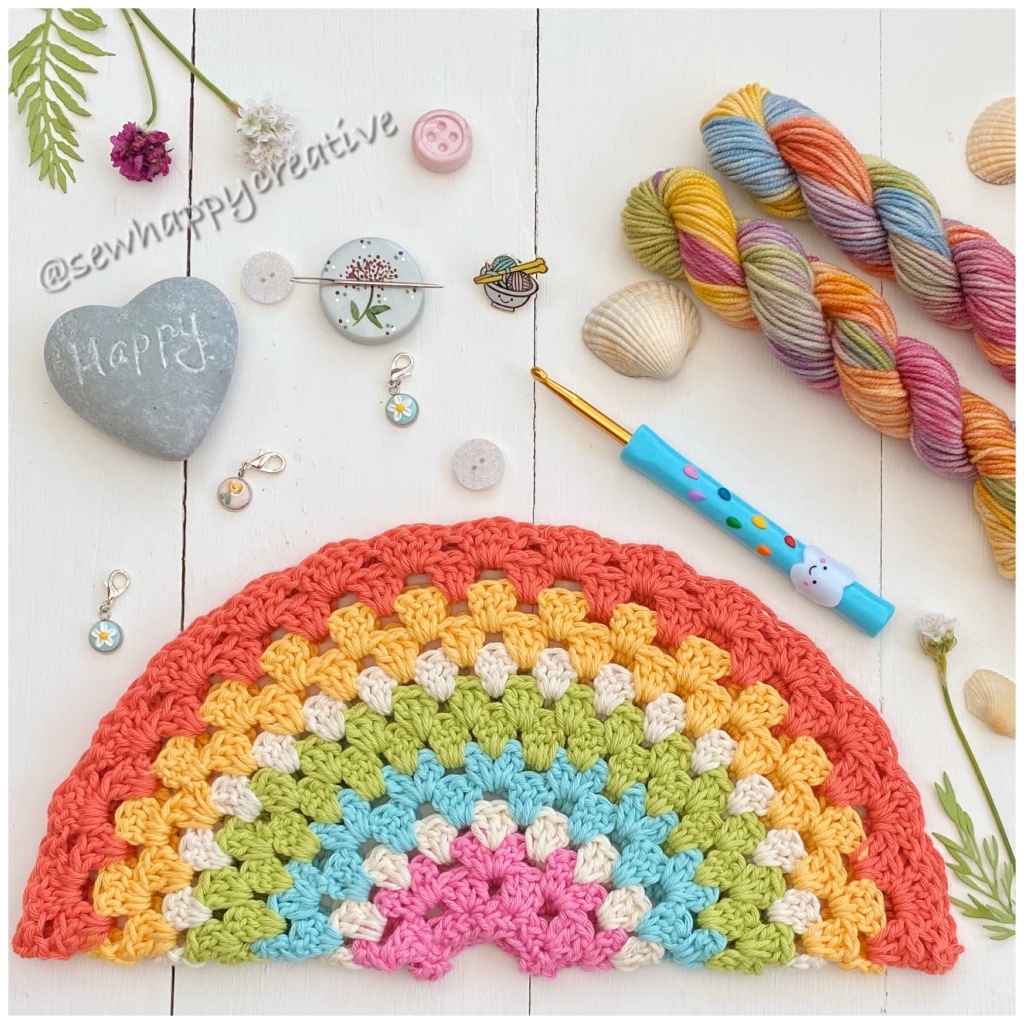
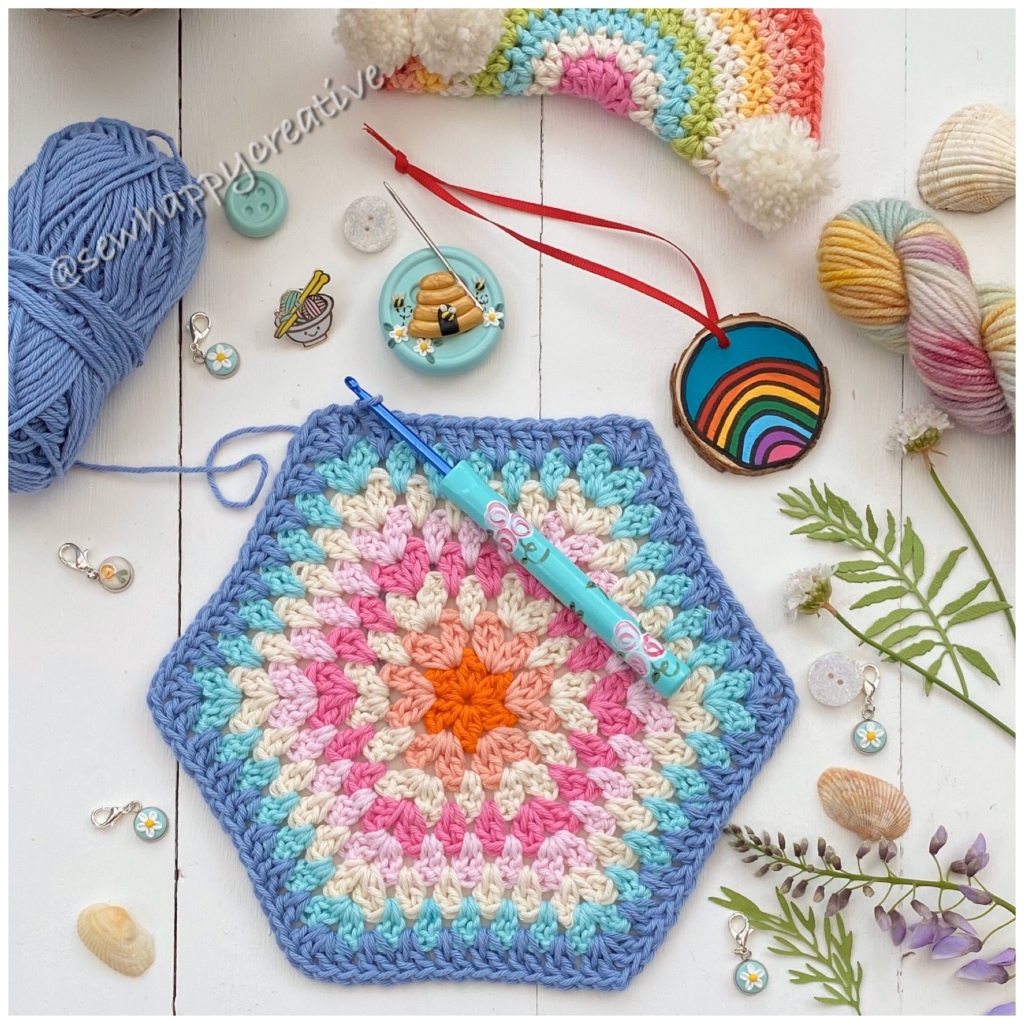
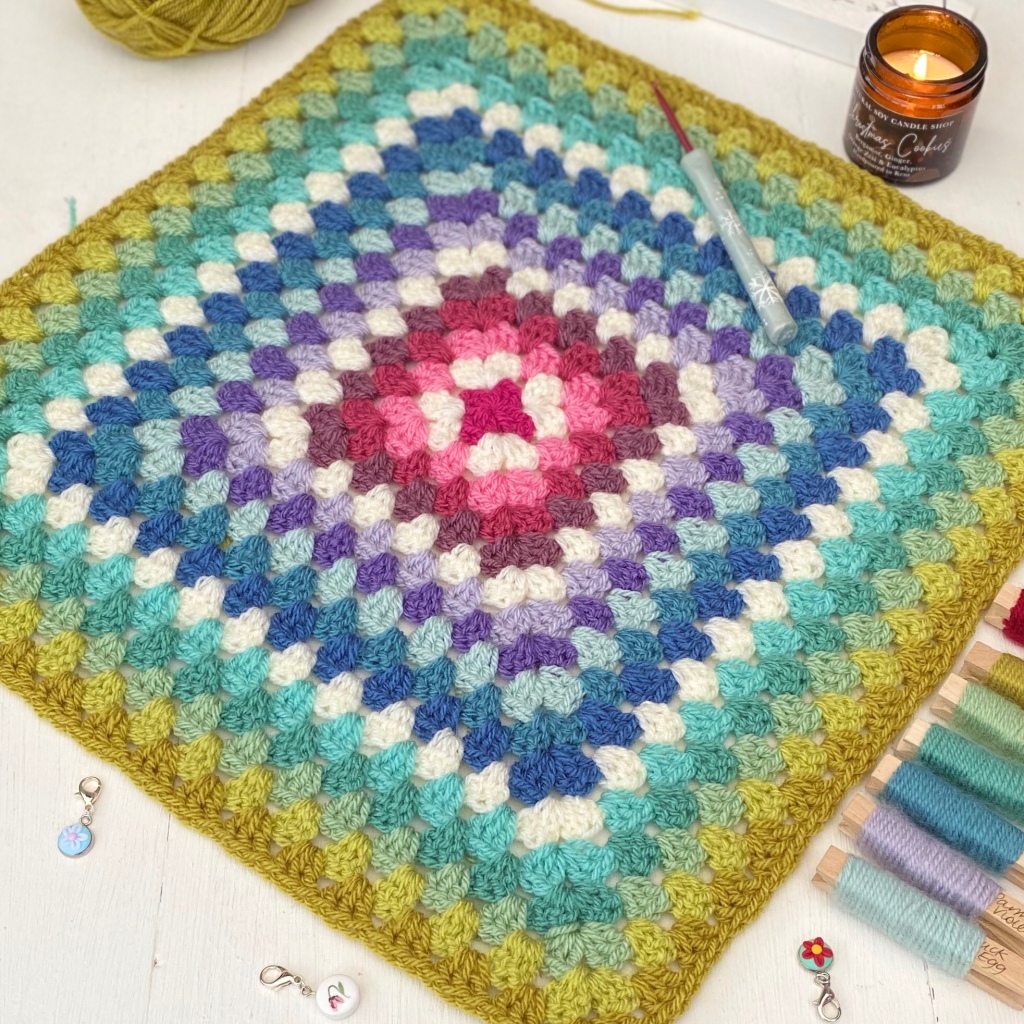
Hope blanket pattern notes:The main part of the blanket is large granny square with traditional granny square stripes. To keep your square from twisting and corners neat, your square is flipped over after each round alternating from RS and WS rounds, start each new round with the change of colour in a different corner to the previous round, we like to start our next round in the corner to the left of the shade you fastened off in the previous round. This will keep your square neat when your ends are stitched in. ©Copyright SewHappyCreative 2020

Hope blanket colour sequence: using a 4mm hook and the colour sequence guide below, make one large granny square. Continue working in rounds

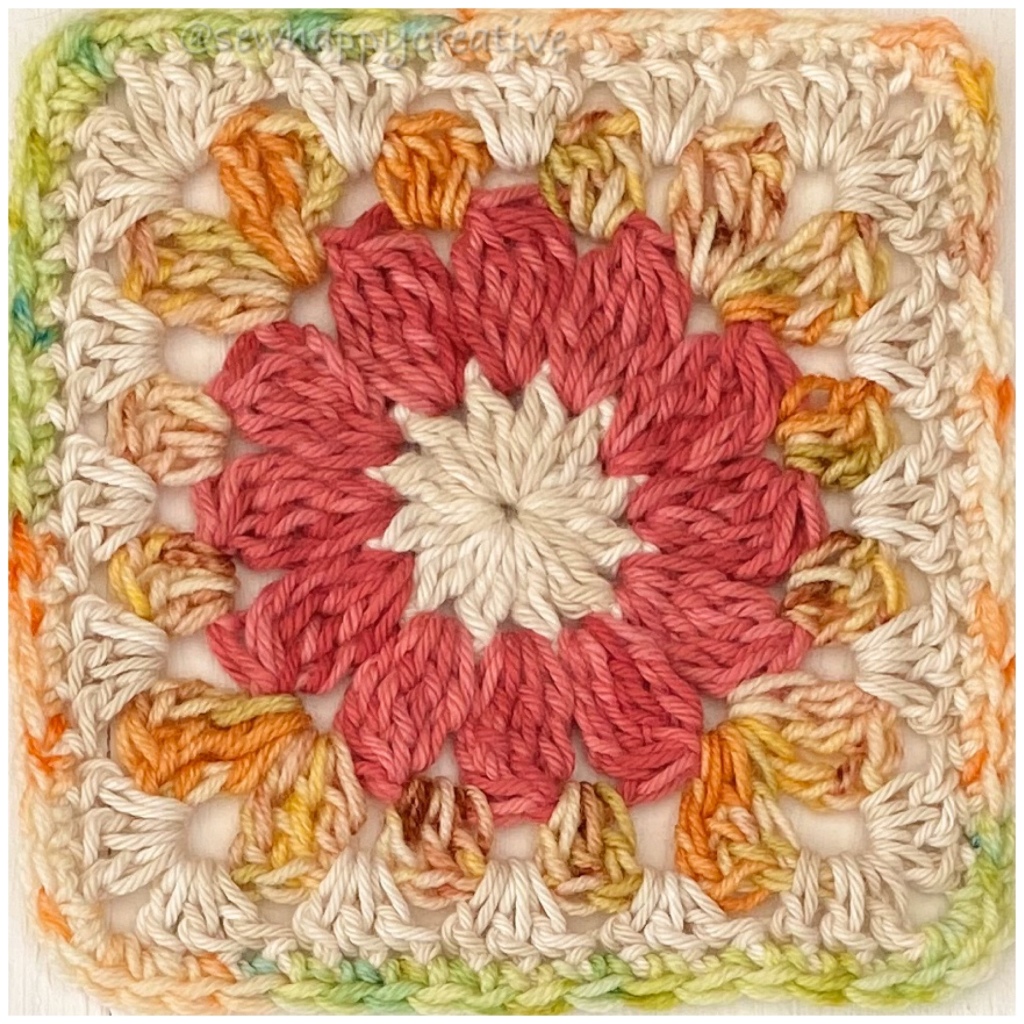
Following the colour sequence guide below part 1 is Rounds 1-20, working with your favourite method for making a granny square or use mine free on my blog page, https://sewhappycreativeuk.wordpress.com/2019/09/27/granny-square-love repeat rounds 4 from the granny square pattern remembering to flip your square after each round, continue working 3tr, in each sp and (3tr, ch1, 3tr,) in each corner sp, ss to join each round to beg ch-3. . ©Copyright SewHappyCreative 2020

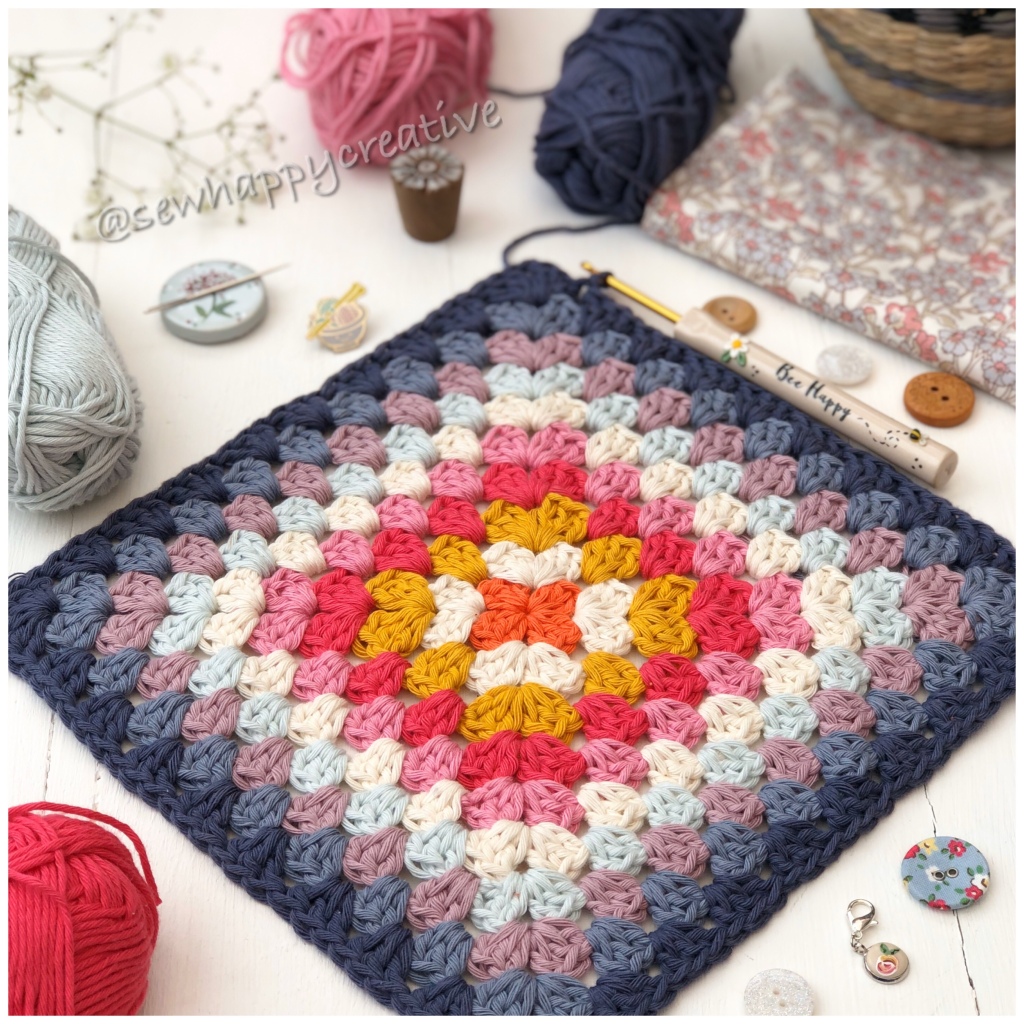
All yarn I’ve used is Stylecraft Special Dk on a 4mm hook.

Round 1 Fuchsia Pink (1827) Round 2 Cream (1005)

Round 3 Fondant (1241) ~ Round 4 Raspberry (1823)

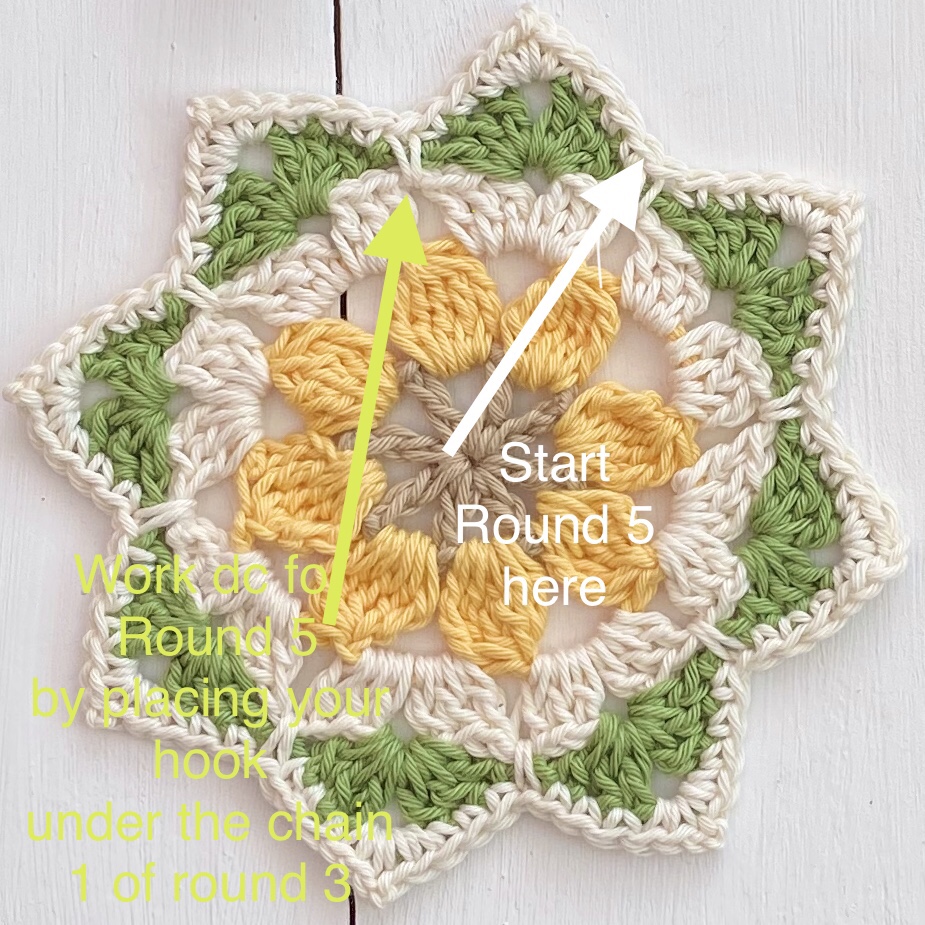
Round 5 Grape (1067) Round 6 Cream (1005)

Round 7 Parma Violet (1724) Round 8 Violet (1277)

Round 9 Duck Egg (1820) Round 10 Storm (1722)

Hope Traditional Granny square blanket pattern :Rounds 1-10

Round 11 Denim (1302) Round 12 Cream (1005)

Round 13 Spearmint (1842) Round 14 Sage (1725)

Round 15 Lincoln(1834) Round 16 Pistachio (1822)

Round 17 Lime (1712) Round18 Cream (1005)

Round 19 Mustard (1823) Round 20 Gold (1709)

Round 21 Camel (1420) Round 22 stone (1710)

Round 23 parchment( 1218) Round 24 mocha (1064)

Round 25 Cream (1005) Round 26 spice (1711)

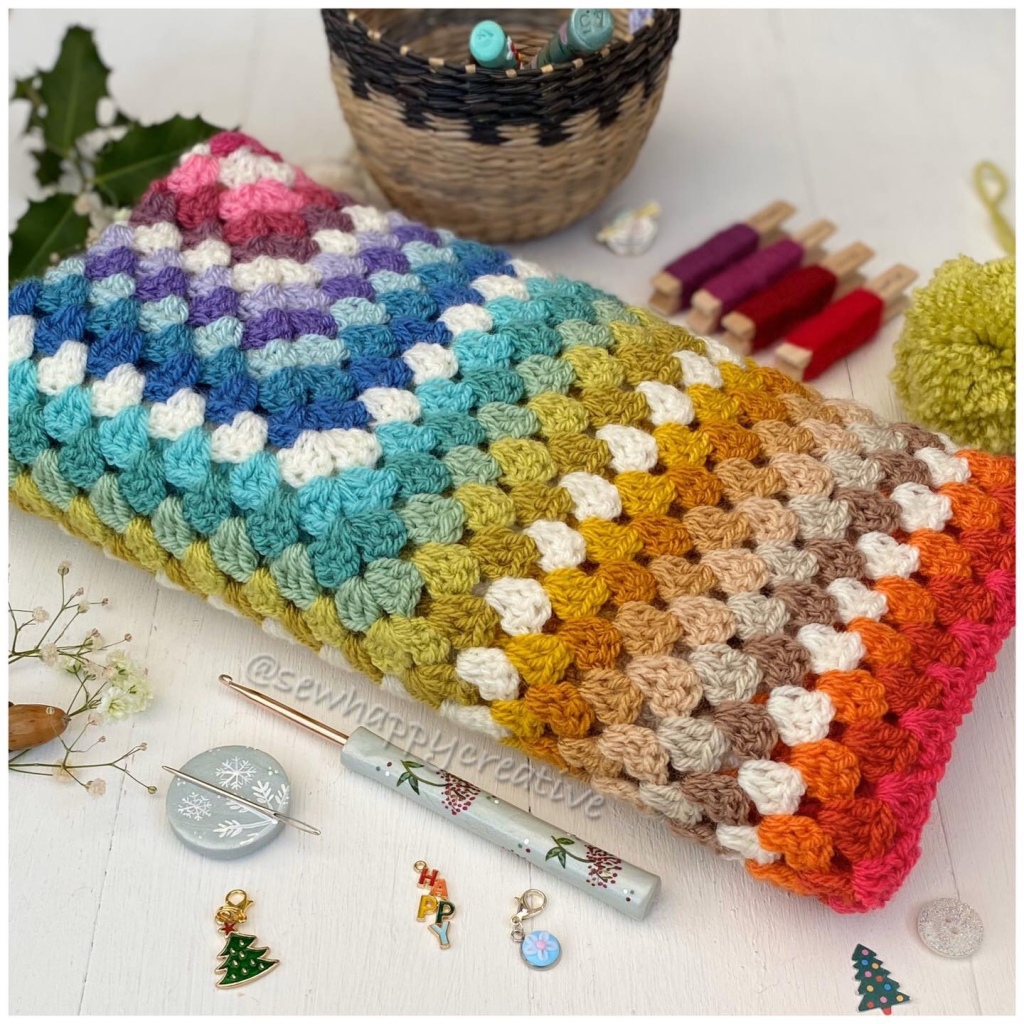
Round 27 Tomato (1723) Round 28 Pomegranate (1083)

Round 29 Copper (1029) Round 30 Matador (1010) Round 31Boysenberry (1828), Round 32 Cream (1005)

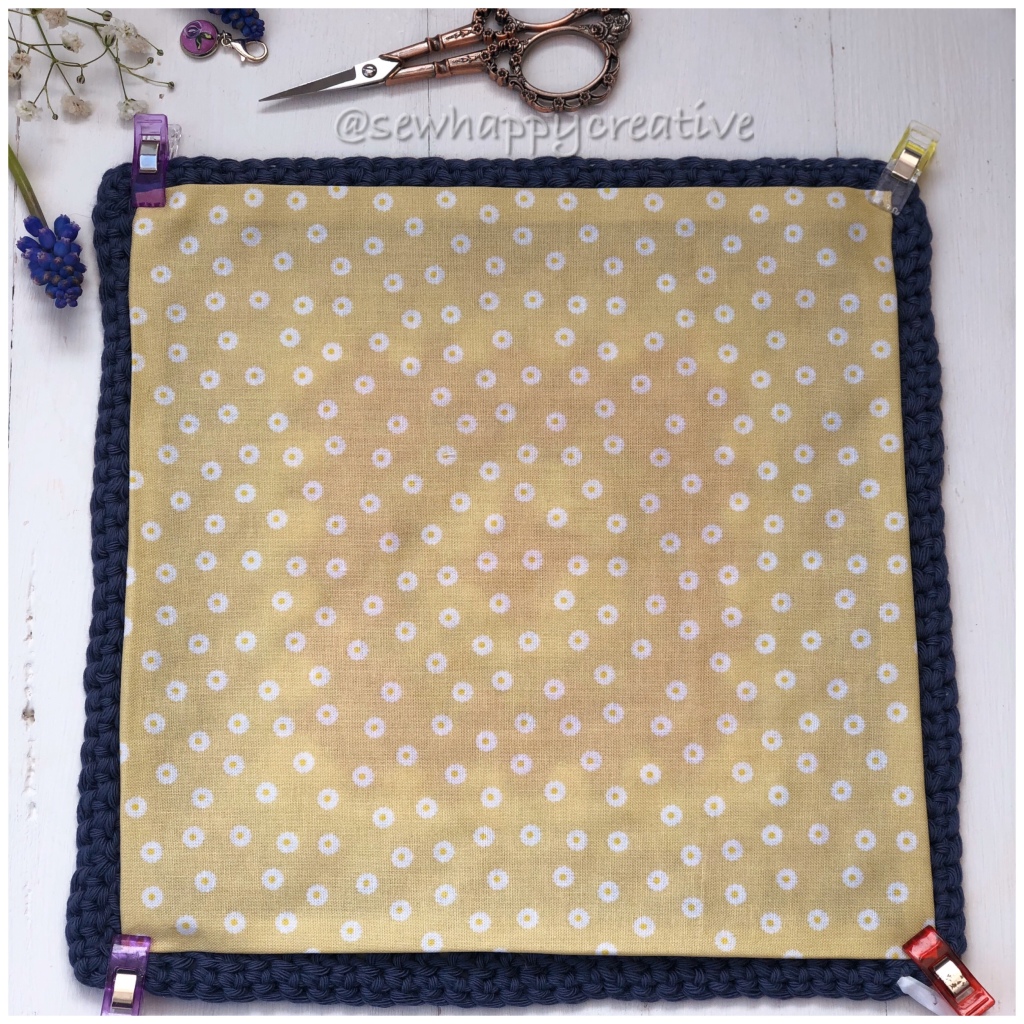
My border . Using any colour you like .

Border Round 1 & 2 Htr in every stitch, working (2ht,ch2,2htr,) in each corner .

Round 3. Herringbone htr * in every stitch, working (2htr herringbone ch2, 2htr herringbone ,) in each corner . *** this stitch can be found on my Instagram reel there’s a video tutorial .

Round 4, work (1dc, 1ht, 1dc, ch2, 1dc, 1ht, 1dc,) in each corner , ss in each of next 2sts, *(1dc, 1ht, 1dc, ) , ss in each of next sts, * repeat from *to * along each side then work your corners as before don’t forget to ss, in each of next 2sts after each corner before you repeat *to * . This pattern is a free gift and written in my spare time the same copyright applies to this pattern including the colours used for my design it’s is not permitted to copy the unique colours in full or part and claim it’s your own. This pattern remains the property of SewHappyCreative, you may not copy, share, reproduce in away, including any video tutorial or sell the pattern itself. You are welcome to sell your finished creations in small quantities made from this pattern, but we kindly ask that you credit us with a link to our Etsy Shop www.etsy.com/shop/SewHappyCreative if selling online. ©Copyright SewHappyCreative 2022 For lots more gorgeous patterns including my latest new sock pattern pop over to my Etsy shop https://www.etsy.com/uk/SewHappyCreative/listing/1337260770/crochet-pattern-crochet-sock-pattern?

My latest bag pattern https://sewhappycreative.etsy.com/listing/1572518575

Christmas Pudding Bauble

©Copyright SewHappyCreative 2020

Here’s a couple of really cute Christmas decoration, they whizz up in no time at all.

Free patterns are written in my spare time and not nearly as detailed as patterns in my Etsy shop. https://www.etsy.com/shop/SewHappyCreative I have included as many photos to help you and there’s pattern notes below. I always recommend reading all patterns notes prior to starting your pattern, I hope you have fun making your Christmas decorations. You are welcome to sell your finished creations made from my pattern, however you may not copy, share, reproduce in any way including video tutorials or sell the pattern itself and we kindly ask that you link to our Etsy shop if selling online https://www.etsy.com/shop/SewHappyCreative ©Copyright SewHappyCreative 2020 So let’s get started, Happy crocheting 🧶

Pattern notes: Ch1 at beginning of each round does not count as stitch throughout, all rounds are joined with a slip stitch although you could work the pattern without joining the round as a spiral but when you change shades you will get a “jog” rather than a smooth colour change. The main part of the crochet bauble is worked without being attached to the bauble, after Round 17 the bauble is placed inside your crochet and the remaining rounds are crocheted around your bauble. It’s important to fasten off all yarn ends prior to Round 17. Note your decreases are worked as 2dctog.

You will need: 3mm crochet hook ~ Dk cotton yarn, I used Rico Ricorumi in shades nougat, cream, ivy green, wine red,~ plastic baubles approx 5cm diameter these are available at reasonable prices in supermarkets ~ wool needle for sewing in yarn ends ~ scissors ~ glue gun or fabric glue for attaching holly leaves and berries. 🎄

Note : your decreases are worked as 2dctog ( US 2 sctog)

Round 1 Using nougat Ch2, 6dc in 2nd ch from your hook, ss to join in first dc (6sts) Round 2 Ch1, 2dc in each stitch around, ss to join in first dc (12sts)

©Copyright SewHappyCreative 2020

Round 3 Ch1, *(2dc in next st, 1dc in next st,)*rep from *to* around, ss to join in first dc (18sts). Round 4 Ch1, dc in every st around, ss to join in first dc (18sts)

©Copyright SewHappyCreative 2020

Round 5 Ch1, *(2dc in next st, 2dc,)* rep from *to *around, ss to join in first dc (24sts). Round 6 Ch1, dc in every st around, ss to join in first dc (24sts)

Round 7 Ch1, *(2dc in next st, 3dc ,)* rep from *to * around, ss to join in first dc (30sts). Round 8 Ch1, dc in every st around, ss to join in first dc (24sts) Round 9, 10, 11, 12, 13, repeat Round 8, at the end of Round 13 join in cream. Fasten off nougat.

Round 14, 15, Using cream Ch1, dc in every st around, ss to join in first dc (30sts)

Round 16 Decrease round , Ch1, *(2 dctog, 3dc)* repeat from *to * around, ss to join in first dc (24sts)

Round 17, Using cream Ch1, dc in every st around, ss to join in first dc (24sts )** Insert your bauble next making sure you fasten off your yarn ends before placing your bauble inside your crochet. The remainder of your rounds are worked with the bauble inside .

I find it handy to remove the top of the bauble and replace it after you complete your bauble. Round 18 Decrease round , Ch1, *(2dctog, 2dc)* repeat from *to * around, ss to join in first dc (18sts )

©Copyright SewHappyCreative 2020

Round 19 Decrease round , Ch1, *(2 dctog, 1dc)* repeat from *to * around, ss to join in first dc (12sts)

Round 20 Decrease round , Ch1, *(2 dc2tog,)* repeat from *to * around, ss to join in first dc (6sts) Fasten off cream work a couple of stitches to secure the end of your yarn and cut it leaving about 4cm, post the end of the yarn inside the bauble and replace the top. If you want to secure the top use a fabric glue or glue gun to attach.

©Copyright SewHappyCreative 2020

To make your berries: make 2, Round 1 Ch2, 6dc in 2nd ch from your hook, ss to join in first dc (6sts) Round 2 Ch1, dc in every st around, ss to join, cut yarn leaving a long length of yarn to thread through the last round, pull up tightly and fasten off. To make your Holly leaves: make2 ,Ch 8, ss, in 2nd & 3rd ch from hook, *(htr, in next st, ch2, ss in 2nd ch from hook (makes the point of your holly) ss in base of htr),* ss in next st, repeat from *to *, ss, in next st, work from * to* in the last stitch, turn and work down the opposite side of your chain like a mirror image , ss, in next st, work from * to* in next st, ss in next st, work from * to * in next st , fasten off and weave in your ends or leave a length of yarn to attach . I fasten mine off and attached my holly and berry leaves with a glue gun.

©Copyright SewHappyCreative 2020

Happy Christmas, I hope you enjoy making your low calorie Christmas pudding best wishes SewHappyCreative X 🎄❤️💚. 🎄 For more patterns scroll down on my blog by clicking on “ older posts” at the bottom of each page or pop over to my Etsy shop https://www.etsy.com/shop/SewHappyCreative

Granny Square goes Diagonal 💗

Diagonal Granny Square

There’s so many ways to do this pattern and believe me I’ve tried quite a few. It’s a fun design and very versatile, I’m including some basic instructions for making it into a square. Just like a traditional corner to corner blanket it can be shaped into a oblong by not decreasing evenly on both sides. When I first made my square I hadn’t yet decided on wether or not I’d add a border, so when I did decide to add the border I needed to change my design slightly to allow the corners to be added with ease . Here’s how I made my square and I will be adding a more detailed pattern to my Etsy shop soon. If you want to make it into a blanket, complete more rows and decrease in the same way as my motif.

Free patterns are written in my spare time and not nearly as detailed as patterns in my Etsy shop. https://www.etsy.com/shop/SewHappyCreative I have included as many photos to help you and there’s pattern notes below. I hope you have fun making your granny squares diagonally. Happy crocheting 🧶

You are welcome to sell your finished creations made from my pattern, you may not copy, share, reproduce in any way including video tutorials or sell the pattern itself and we kindly ask that you link to our Etsy shop if selling online https://www.etsy.com/shop/SewHappyCreative ©Copyright SewHappyCreative 2020 So let’s get started you will need to be familiar with the following stitches.

Row 1 Ch7, into the 5th chain from your hook 3tr, sk 1ch, 1tr, in last stitch, turn.

Row 1 ©Copyright SewHappyCreative 2020

Using the photo below to guide you, Row 2 Ch3 (counts as tr), 3tr in space before 3tr group , 4tr in space after 3tr group, turn. Row 3 ch3 (counts as tr), 3tr, in sp next to ch3, 3tr in next sp, 4tr in last sp. Row 4 7 ch3 (counts as tr), 3tr, in sp next to ch3, 3tr in next 2sp’s, 4tr in last sp. Continue working ch3( counts as tr) 3tr in sp next to ch3, 3tr in spaces between and 4tr in last sp, see photo . You can make your square as large or small as you like using this method. To make your square like mine continue to Row 8

Round 2 onwards ©Copyright SewHappyCreative 2020

To decrease your square Row 8 Ch3 (counts as tr) skip 4tr group from previous row and work 3tr in next sp and every sp, at the end of your row, work 1tr in the top of your ch3 from previous row, continue working Ch3, sk first 3tr group, 3tr in next and every sp, at the end of your row, work 1tr in the top of your ch3 from previous row, just as you did before. turn and repeat round 8 until you have completed to Row 13, at the end of this row, Ch2, turn and ss into your beg ch-3, this creates a small loop to make the corner when you add a border.See photo below. To add a border work (2htr, ch1, 2htr,) in each corner and 3 htr in the row ends between treble or beg ch3,

Row 13 ch-2, ss into beg ch-3. ©Copyright SewHappyCreative 2020

To work a multi coloured square, change colour on every row by completing your final part of your stitch from the previous row with your new shade, use a reef knot at the end of each row and sew in your ends after you complete the border, this way, you can crochet over the top of your yarn ends and weave them neatly into the border edge. Have fun and enjoy getting creative 💗🌈🧶. ©Copyright SewHappyCreative 2020

Circle Granny Square Motif

Here’s a lovely little free pattern for you to enjoy and make whatever takes your fancy. Free patterns are written in my spare time and not nearly as detailed as patterns in my Etsy shop. https://www.etsy.com/shop/SewHappyCreative I have included as many photos to help you and there’s pattern notes below. I hope you have fun making circles into squares. Happy crocheting 🧶

You are welcome to sell your finished creations made from my pattern, you may not copy, share, reproduce in any way including video tutorials or sell the pattern itself and we kindly ask that you link to our Etsy shop if selling online https://www.etsy.com/shop/SewHappyCreative ©Copyright SewHappyCreative 2020 So let’s get started you will need to be familiar with the following stitches.

Pattern notes: I made my circles in one shade but you can change shade on each round if you prefer and get creative making a multi colour circle. Change shade by completing the final part of your treble stitch of the previous round with your new shade. I used a contrast shade to turn my circle into square for Round 5, I like to start my round just after the last treble stitch of Round 4 but it’s entirely up to you where you start Round 5.

Foundation Round Using any colour make a magic loop or chain5, and ss to join into a ring.

Round 1 Into the magic loop or ring ch3 (counts as tr), 11tr into the ring, ss to join into beg ch-3, fasten off. (12tr)

Round 1

Round 2 ch3 (counts as tr), 1tr in same stitch as ch3, *2tr in next tr* repeat from *to around ss to join into beg ch-3, fasten off. (24tr)

Round 2

Round 3 ch3 (counts as tr), 1tr in same stitch as ch3, 1tr in next tr, *2tr in next tr, 1tr in next tr,* repeat from *to * around ss to join into beg ch-3, fasten off. (36tr) Round 4 ch3 (counts as tr), 1tr in same stitch as ch3, 1tr in each of next 2tr, *2tr next tr, 1tr in each of next 2tr stitches * repeat from *to * around ss to join into beg ch-3, fasten off. (48tr) your circle is complete.

Round 3

Round 5 In any stitch and with your contrast shade, ch4 (counts as dtr), 1dtr, ch2, 2dtr, in same stitch, this is your first corner, *then work the next 11sts as, 2tr, 2htr, 3dc, 2htr, 2tr, * for your your next corner (2dtr, ch2, 2dtr), then repeat from * to * around working your corners as ( before and your straight sides from *to *, ss to join into beg ch-4, fasten off. (2dtr, ch2, 2dtr in each corner and 11sts on your edges ) If you like you can finish each square with a round of htr prior to joining.

Completed Square Motif.

Autumn Flower Granny Square

Just a note about how to use my pattern .You are welcome to sell your finished creations made from my pattern, you may not copy, share, reproduce in any way including video tutorials or sell the pattern itself and we kindly ask that you link to our Etsy shop if selling online https://www.etsy.com/shop/SewHappyCreative ©Copyright SewHappyCreative 2020 Lets get started you will need to be familiar with the following stitches.

Pattern notes: My granny square motif is made of 3 rounds, Round 1 & 2 use cluster stitches, this is where several stitches are grouped together (worked in the same space or stitch) by not completing the final part of the stitch and leaving the loops on the hook, before pulling the hook through all the loops of the incomplete stitches at the end, and forming the cluster stitch. It’s much the same as a decrease is done .I used Scheepjes catona cotton denim and my own hand dyed yarn.

Foundation Round Using any shade make a magic loop or ch5, ss to join into a ring.

Rounds 1 Into the magic loop or ring ch3 (counts as tr), 1tr, ch1, (*2trcl, ch1,*) repeat from * to * 10 times , ( that’s 11 times in total ) ss to join to beg ch-3, fasten off. Total 12 trcl groups.

Rounds 2 Using any shade attach yarn in any ch-1sp of round 1, ch4 (counts as dtr) 3dtrcl, ch3, (4dtrcl, ch3) in every ch-1sp around ss to join into first stitch after your beg ch-4.( 12 petals)

Round 3 Using any shade attach yarn in any ch-3sp of round 2, ch4 (counts as dtr) 2dtr, ch2, 3dtr in same sp, 3tr in next 2sp’s *(3dtr, ch2, 3dtr) for the corner, 3tr in next 2 sp’s* repeat from * to * around, ss to join into beg ch-4.

Sunflower goes Rainbow 🌈

This design belongs to SewHappyCreative, You may not copy, share, reproduce in any way (this includes altering the pattern in any way and calling your own design, this is a breach of our copyright ) including video tutorial or sell the pattern itself and we kindly ask that you credit us and link to our https://www.etsy.com/shop/SewHappyCreative if selling online.* please contact us via Etsy conversation if you wish to sell your items made from this pattern.
Pattern may not be used for teaching a group without prior consent.
©Copyright SewHappyCreative 2021

My Rainbow Sunflower is made using my sunflower granny square motif which is free here on my blog page https://sewhappycreativeuk.wordpress.com/2019/07/20/sunflower-inspired-granny-square-motif/ or available in my Etsy shop as a handy pdf pattern https://www.etsy.com/uk/SewHappyCreative/listing/708889306/sunflower-granny-square-crochet-pattern? To make your rainbow sunflower complete exactly as Rounds 1 & 2, of the pattern .

Round 3 You will need to fasten off each shade as you go and weave in your yarn ends and believe me there’s a lot of yarn to weave in 🙈,the petals are worked all as the original pattern with an extra ch1 when you join in your new shade. Choose whichever colour you like to start your first petal and work the first petal exactly as Round 3 of the pattern, then ch2, as the pattern, pull your next shade through the loop to join, ch1, with your new shade for your petal, fasten off your shade from your previous petal and tie a little knot to secure it, ( I’m not a fan of knotting yarn but needs must for this project ), complete your petal as the pattern, ch2, as the pattern and join in your next shade by pulling a loop though and ch1, knot to secure. Repeat this until all 12 petals are complete remembering to weave in your ends as you go. My yarn that I knot at the top I weave along the chain and diagonally across the back of my petals to fasten off. There’s some photos below to help guide you .Each petal takes about 1metre of yarn so handy to use up small amounts. Happy Rainbow Crocheting 🧶🌈

Sunflower Star Coaster

I absolutely adore sunflowers and plant some in my garden every year, I thought it would be fun to make a little sunflower coaster to brighten up my patio table during the summer months. They take no time at all to make and are perfect for using up small amounts of yarn from your stash. They look fab in all shades and you could try bright pinks and mustard or for a beach themed set of coasters blues and soft pink and brown shades. Enjoy getting creative, with different colours, happy crocheting best wishes Fiona xx

This design belongs to SewHappyCreative, You may not copy, share, reproduce or modify in any way (this includes altering the pattern in any way and calling your own design, this is a breach of our copyright ) this includes video tutorial or sell the pattern itself and we kindly ask that you credit us and link to our https://www.etsy.com/shop/SewHappyCreative if selling online.* please contact us via Etsy conversation if you wish to sell your items made from this pattern.
Pattern may not be used or distributed for teaching a group without prior consent.
©Copyright SewHappyCreative 2020

Let’s get started you will need to be familiar with the following stitches. Please note this pattern is written in UK terms.

Used Stitches: UK English. US abbreviations below in brackets. ch = chain ss = slip stitch dc = double crochet (US single crochet) tr = treble (US double crochet) dtr = double treble crochet (US treble crochet) sp = space space sk st. = skip skip beg = beginning. beginning

4dtrcl = 4 double treble cluster. (US 4 treble crochet cluster) (use this to start Round 2)

5dtrcl = 5 double treble cluster. ( US 5 treble crochet cluster use this for the rest of Round 2 )

Pattern notes: My sunflower star coaster motif is made of 5 rounds, Round 2 use cluster stitches, this is where several stitches are grouped together (worked in the same space or stitch) by not completing the final part of the stitch and leaving all loops on the hook, before pulling the hook through all the loops of the incomplete stitches at the end, and forming the cluster stitch. It’s much the same as a decrease is done .I used Stylecraft classique cotton dk, but any double knitting yarn will do, and a 4mm hook.

Foundation Round Using brown make a magic loop or ch5, ss to join into a ring.

Round 1 (RS) Into the magic loop or ring ch5 (counts as tr, ch2 ), (1tr, ch2,) 7times, ss, to join into 3rd chain of beg ch-5, fasten off. (8tr, 8x ch-2sp)

Rounds 2 Using yellow attach yarn in any ch-2sp of round 1, ch4 (counts as dtr) 4dtrcl, ch5, (5dtrcl, ch5) in every ch-2sp around ss to join into first stitch after your beg ch-4.( 8 petals)

Round 2

Rounds 3 Using Ivory attach yarn in any ch-5sp of round 2, ch3 (counts as tr) 2tr, ch2, 3tr, ch1, into same ch-5sp, working out of ch-5 spaces only, *3tr ch2 3tr, ch1, *repeat from to around, slst to join to beg ch-3.

Rounds 4 Using green attach yarn in any ch-2sp, of round 3, ch3 (counts as tr) 2tr, ch2, 3tr, ch2 , into same ch-2sp, working out of ch-2 spaces only and skipping ch-1sp’s, *3tr ch2 3tr, ch1, *repeat from to around, slst to join to beg ch-3.

Rounds 5 Using white attach yarn into first tr of 3tr group as photo Round 5, ch1 (counts as dc) 1dc into each of next 2tr, (2dc, ch2, 2dc,) in next ch-2sp, 1dc in each of next 3tr, placing your hook under the ch1sp of Round 3, work a long dc, * 1dc, in each of next 3tr, (2dc, ch2, 2dc,) into next ch-2sp, 1dc in each of next 3tr, placing your hook under the ch-1sp, of Round 3, work a long dc,* repeat from to around, slst to beg ch-1, fasten off. Weave in yarn ends.

Round 5

You may also like our sunflower 🌻 granny square motif, pattern is on our blog page or a pdf version available in our Etsy Shop https://www.etsy.com/uk/SewHappyCreative/listing/708889306/sunflower-granny-square-crochet-pattern

Granny Rainbow 🌈

During the Coronavirus pandemic rainbows have become a symbol of hope and thanks to key workers. There have been some truly wonderful rainbows drawn by children and displayed in windows and on doors during lockdown, they have cheered people up as they pass by and helped keep us all positive. I hope my granny rainbow will make you and others smile as you make it and share in your windows afterwards.

Here’s how I made mine. It’s based on a traditional granny in the round mandala and then folded in half afterwards, I used a round of dc to join my circle, and added a little loop on my last round to hang it up by. It’s a really simple little pattern and easily adjusted by the number of rounds you work to get the size you like. Try working in 4ply for a smaller version or adding a picot edge on the final round. We recommend reading all pattern notes before starting the pattern.

Pattern notes : I flipped my circle after each round and worked my rounds RS & WS. Ch 3 at the beginning of every round counts as treble throughout the pattern. Ch 1 is worked between 3tr groups unless otherwise stated. Change your shades on every two rounds or every round. I used Stylecraft dk classique cotton in shades Fondant, Ivory, Peppermint, Soft Lime, Saffron, Shrimp, Wisteria and Pomegranate. Any Dk yarn will do, raid your sash and let’s get started. ©Copyright SewHappyCreative 2020 My pattern is written in Uk English crochet terms with US terms in brackets in the key.

You will need:
4mm hook
Used Stitches:
UK English. US abbreviations below in brackets.
ch = chain
ss = slip stitch
tr = treble (US double crochet
sp = space space
sk. = skip
beg = beginning. beginning
dc = sc RS = Right side WS = Wrong side

Foundation Round: using a 4mm hook, ch24 , ss to join into a ring (RS)

Round 1 Working into the chains, ch3 (counts as tr), 2tr, in base of 3ch, ch2, sk 2ch, *3tr in next ch, 2ch, sk 2ch,* repeat from *to * around, ss to join to beg ch- 3, fasten off. (8tr clusters, 8x ch-2). (RS) turn your work over to work your next round in the opposite direction, see pattern notes.

Round 2 Ch3 (counts as tr), 3tr, in same ch-2sp, ch1, *4tr, in the next ch-2sp, ch1, *) repeat from * to * around ss to join into beg ch-3sp. Flip your rainbow over.(WS) ( 8 x 4 tr groups)

Round 3 Working out of every ch-1 sp and between 4 treble groups, Ch3 (counts as tr), 2tr, in same ch-1sp, ch1, 3tr, between 4tr group, ch1, *3tr in next sp, ch1, 3tr between 4tr group, ch1,)* repeat from * to * around ss to join into beg ch-3sp. Flip your rainbow over.(RS)

Round 4 Ch3 (counts as tr), 2tr, in same ch-1sp, *3tr, in the next ch-1sp, ch1, *repeat from * to * around ss to join into beg ch-3sp. Flip your rainbow over.(WS)

Round 5 Ch3 (counts as tr), 3tr, in same sp , *4tr, in the next sp,* repeat from * to * around ss to join into beg ch-3sp. Flip your rainbow over.(RS) ( 16 x 4 tr groups)

Round 6, 7, 8, 9 Repeat Round 4, changing shades as desired and joining where you finished your last round, remembering to flip your rainbow over for each round. All the treble groups have ch1 between them, if you find your circle is curling add an extra ch between your groups as your circle should be flat, you will fold in half later and join it together with a round of dc.

Round 10 & 11 As Round 4 but with ch2 between each treble group.

Round 12 As Round 5. After Round 12 make sure all your yarn ends are sewn in before completing your Rainbow 🌈

Round 13 To complete your rainbow fold it in half making sure all your treble groups match, I tacked 4 of my rounds together to make it stay in place while I completed my joining round. Dc both sides together matching your 4 treble groups, turn, work a second row of dc to complete your rainbow if you want to hang it up, add a loop on this round at the centre of your rainbow by chaining 6, dc into the chain and ss over it. This way you won’t have to break of your yarn, ss either side of your loop before completing the row. Fasten off, weave & stitch in yarn ends.

For more lovely patterns including our Rainbow 🌈 granny ripple, pop over to our Etsy shop https://www.etsy.com/shop/SewHappyCreative
©Copyright SewHappyCreative 2020

Granny Hexagon Love

In these uncertain times I’ve so enjoyed the simple things in life and crochet is no exception. My granny hexagon is relaxing and soothing to make. It can made with as many rounds as you like, by adding just a few rounds to make a small motif for joining into a blanket or make as a much larger hexagon like mine, that I’m making into a summer cushion for my garden bench. I’ve used Stylecraft classique cotton dk, but any dk yarn will do. It’s a fab fun way to use up your stash too. The pattern below follows a traditional granny square stitch but instead of using 3tr group stitches together I’ve used just 2tr groups stitches, there’s also an alternative method at the bottom of the pattern for using treble cluster stitch which gives a very pretty effect but you will need to remember to add a chain stitch between your 2 treble cluster stitches . ©Copyright SewHappyCreative 2020 For my patterns pop over to our Etsy shop https://www.etsy.com/shop/SewHappyCreative

You will need:
4mm hook
Used Stitches:
UK English. US abbreviations below in brackets.
ch = chain
ss = slip stitch
tr = treble (US double crochet
sp = space space
sk st. = skip skip
beg = beginning. beginning
2trcl = 2 treble cluster see notes below ( US 2 double crochet cluster) RS = Right side WS = wrong side

2 treble cluster stitch: (Yoh, insert hook into magic loop or ring, yoh and pull through a loop, yoh and pull through 2 loops,) twice, yoh pull through remaining 3 loops on hook.

Pattern notes: To keep your hexagon flat and minimise the need for blocking, I have flipped my hexagon over after each round, alternating each round from RS and WS rounds, start each new round with the change of colour in a different corner to the previous round, and from where you fastened off . This will keep that back of your work neat and less bulky as sewing in your yarn ends will be evenly distributed on the back.

Foundation Round: using a 4mm hook, make a magic loop or ch5, ss to join in to a ring.(RS))


Round 1 In the magic loop or ring, ch3 (counts as tr), 1tr, ch1, (2trcl, ch1,) 5 times, ss to join to beg ch- 3, fasten off. (6trcl groups, 6 x ch-1sp’s) flip your hexagon over as described in my pattern notes above. (RS)


Round 2 Attach a new colour yarn in any ch-1sp of previous round, ch3 (counts as tr), 1tr, ch1, 2tr, in same ch-1sp, (2tr, ch1, 2tr,) in each ch-1sp, around, ss to join into beginnings ch-3, fasten off. Flip your hexagon over. (WS)

Round 3 Attach a new colour yarn in any ch-1 space of round 2, ch3 (counts as tr), 1tr, ch1, 2tr, in same ch-1sp, 2tr, in the next sp, (2tr, ch1, 2tr,) in next ch-1 sp, 2tr, in next sp repeat from * to * around ss to join into beg ch-3sp. Flip your hexagon over.(RS)

Round 4 Attach a new colour yarn in any ch-1 space of round 3, ch3 (counts as tr), 1tr, ch1, 2tr, in same ch-1sp, 2tr, in each of next 2 sp’s, (2tr, ch1, 2tr,) in next ch-1sp , 2tr, in each of next 2 sp’s, repeat from * to * to complete the round, ss to join into beg ch-3. Flip hexagon over.(WS)

Round 5 Continue as round 4 by working (2tr, ch1, 2tr,) in every ch-1sp and 2tr in every space between, remembering to flip your hexagon after each round.

Alternate way to make your hexagon like mine below is to work exactly as the Foundation round and round 1 above, then for Round 2 instead of working (2tr, ch1, 2tr,) in each ch-1sp, work ( 2trcl, ch2, 2trcl,) ch1, and 2trcl, ch1, in every sp between, flip your hexagon as above. Continue working 2trcl, ch1, in place of all 2tr, in the spaces between and (2trcl, ch2, 2trcl) in each ch-1p instead of (2tr, ch1, 2tr,) ©Copyright SewHappyCreative 2020


Just a note about how to use my pattern .You are welcome to sell your finished creations made from my pattern, you may not copy, share, reproduce in any way including video tutorials or sell the pattern itself and we kindly ask that you link to our Etsy shop https://www.etsy.com/shop/SewHappyCreative if selling online ©Copyright SewHappyCreative 2020
https://www.etsy.com/uk/SewHappyCreative/listing/764959180/duvet-days-sock-pattern-crochet-sock

Daisy Hexagon ©Copyright SewHappyCreative 2020

Foundation Round: using a 4mm hook, make a magic loop or ch5, ss to join in to a ring.

Round 1 In the magic loop or ring, ch3 (counts as tr), 15tr into the ring, ss to join to beg ch- 3, fasten off. . (RS)

Round 2 In the magic loop or ring, ch3 (counts as tr), 1tr, ch1, (2trcl, ch1,) 15 times , ss to join to beg ch- 3, fasten off. (RS) no need to flip your hexagon if you are using it as small motif

Round 3 As round 3 of main hexagon pattern, follow as Round 4 to make as large as you like.

Granny Square Notions Pouch

Everybody loves a traditional granny square and without doubt they are one of very my favourites makes. They never cease to amaze and please and with different colour combinations the possibilities are endless. This little pattern was inspired by a cushion I made a while back and is really just a miniature version, by leaving the top part unstitched it creates a handy little purse or pouch to keep your hooks and bits& bobs tidy. I’ve also got one with make up in and it’s fab because it’s completely washable. I hope you enjoying making one or two 🙈 happy crocheting 🧶 🌸💕

Granny square notions pouch is perfect to stash your hooks in 💕 my lovely collection of hooks and scissor keeper are from Pedro’s Plaque’s & Pretty Things http://folksy.com/shops/PedrosPlaques

To make your notions pouch : You will need any aran cotton yarn or similar, a 4.5mm hook, piece of fabric the same size as your completed granny square, needle for sewing in ends and a button to fasten your pouch. You can also use dk cotton you would just need to complete more rounds to make it a useful size 🌸💕

Step 1- Make 1 large granny square with as many rounds as you like, I made my granny square using aran cotton from my stash with 10 rounds on a 4.5mm hook, it measured approx 24cm square. The larger your granny square the larger your notions pouch will be. Use your favourite method to make your granny square or follow our tutorial on our blog page https://sewhappycreativeuk.wordpress.com/2019/09/27/granny-square-love-%f0%9f%92%97-tutorial/

Step 2 – Work a round of dc in the same shade as your final round. Fasten off and weave in a all your ends.

Step 3- To line your pouch, cut a piece of fabric the same size as your square approx 24cm, and turn the edge of your fabric under approx 1cm all the way round, press, place your lining on the back of your square exactly as my photo, leaving an edge all the way round. You lining needs to be slighter smaller than your square. Slip stitch your lining in place or machine round, I machine stitched mine as I was getting impatient and wanted to use it for my hooks.

Step 4 – To assemble your pouch, fold your square like an envelope, leaving the top 2 diagonals open and join the bottom 2 diagonals along the yellow arrows. Either whip stitch or crochet the bottom 2 diagonals together using a ss. I crocheted my edged together using a slip stitch with my right sides together so my seams were on the inside of my pouch. I worked through one loop from each side to join as my photos below. Turn to the right side, stitch your button in place and fasten off Ta Dah! once you have made one of these you will have them flying of your hook and they are also a great way to use up your yarn stash or any granny squares you may have.😉🙈.

Join your seams using a whip stitch or slip stitch together through one loop only.
For more patterns and gorgeous hand dyed yarn pop over to our Etsy Shop https://www.etsy.com/shop/SewHappyCreative
Just a note about how to use my tutorial.You are welcome to sell your finished creations made from my pattern, you may not copy, share, reproduce in any way including video tutorials or sell the pattern itself and we kindly ask that you link to our Etsy shop if selling online https://www.etsy.com/shop/SewHappyCreative ©Copyright SewHappyCreative 2020